

 Print recipe

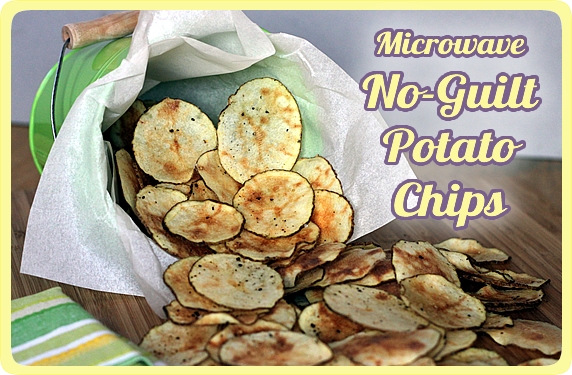
If you asked me to name my favorite foods that are unhealthy and bad for me, potato chips would be near the top of the list along with bacon and butter. As I age mature and find it increasingly challenging to manage my weight along with health issues like King-Man's high blood pressure, I'm trying to find guilt-free (or guilt-reduced) ways to enjoy the naughty foods we like. That's what motivated me to try to make fat-free, low-salt potato chips.
I was a skeptic at first. Fat-free chips? How could they taste good? Cooked in the microwave? Unlikely to turn out crisp they way I like them. But, I wanted to try it, because King-Man and I love potato chips with a sandwich. This was a way to eliminate the fat and drastically reduce the salt.
The results? We love these chips. Mind you, they don't taste like those fried-in-oil-chips we've eaten all our lives. But, they are surprisingly good. King-Man and I had made the switch to baked chips awhile back (there's a Trader Joe's brand we like), so we'd already transitioned away from the Classic Lay's and Ruffles that used to set our standard for a good chip.
Potatoes are good for you. They've gotten a bad wrap. Yes, they're high in carbs. But in moderation, they can be a part of a healthy diet. One medium russet potato (eaten with skin on, like these potato chips) provides these percentages of daily nutrient requirements: vitamin C-26%; potassium-26%; vitamin B6-27%; iron-10%. manganese-19%; fiber-15%; and more. One serving of these chips uses half of a potato. Who knew you could actually enjoy some health benefits from eating potato chips? Life is good.
These microwave chips are ridiculously easy to make. It would take a while to make a party portion of chips, but it's easy to make enough for 4-6 people once you get a system down. Here's how I made mine.
Step-by-step photos for making
Microwave, No-Guilt Potato Chips
Step 1. Assemble the ingredients: russet potatoes (I used organic so that I could leave the skin on--easier and more nutritious), salt, pepper (if desired), canola oil (only if you're microwaving on a plate...explained in Step 2 below).

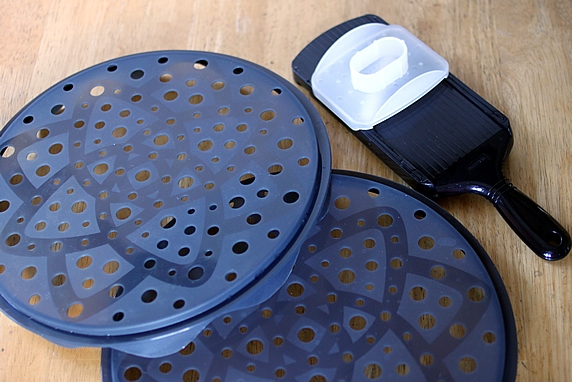
Step 2: Assemble the equipment:
- Microwave chip tray. These trays are 11" in diameter, so make sure your microwave is big enough to accommodate one. OR...You can also use parchment paper sprayed with oil (to prevent sticking) on top of a micro-wave safe plate. The chips don't cook quite as evenly and it takes a little longer, but it is an alternative if you don't want to buy a microwave chip tray.
- Mandoline slicer. I don't know of another way to get paper thin potato slices--they need to be between 1mm and 1.5mm. The thinner the slices the crispier the chips. It's virtually impossible to cut them thinly enough with a knife. Most food processor slicing blades are too thick (mine is 2mm). The only FP I've found with a blade that works for this is the Elite Cuisinart Food Processor Series--they come with an adjustable slicing blade that will cut 1mm slices.
Where to find these gadgets? I got mine on Amazon:
- Mastrad Silicone Microwave Chip Maker (set of 2 trays) -- This is what I have and is used in the photos below. These works great and are dishwasher safe. I like having 2 trays so while one tray cooks I can be loading the 2nd tray. (click here for Amazon link)
- Kyocera Adjustable Mandoline Slicer -- This is the one I have and is pictured below; it's a recommended "Best Buy" by Cook's Illustrated. It's the least expensive mandoline I've found, easy to use, has adjustable blade for straight cutting but no fancy cutting blades; very basic. It gets daily use in my kitchen. (click here for Amazon Link)
- Mastrad Microwave Chip Maker (1 tray) with A Slicer -- I haven't personally used this slicer, but this is the least expensive option I've found for getting both a tray and a slicer. The slicer blade isn't adjustable, but according to the reviews it works well for slicing chips. (click here for Amazon link)
Step 3. Wash potatoes and slice paper thin. I used the 1.3mm setting on my mandoline slicer.
- Leave the skins on the potatoes. It's easier (no peeling), and the skin adds fiber and nutrients.
- Be careful! Mandolines cut fingers, too.
- You can cut thicker slices, too--they will get crunchy, but not crispy, and take longer to cook. The thinner the slice, the crispier the chip.
Step 4. Place slices in a single layer on top of a paper towel. Cover with another paper towel and press down firmly with flattened hands to remove moisture from potatoes. They should look dry on top.
Step 5. Add any desired seasonings. I sprinkled on a smidgeon of sea salt and freshly cracked black pepper.
- The microwave tray instructions say to add the seasoning after they chips are cooked. However, I found it works better to add them before cooking; that way the seasonings stick better as they get cooked onto the chips.
Step 6. Places slices in single layer on microwave tray, and microwave on high until partially browned. The exact cooking time will vary, depending on the size and power of your microwave. In my 1100-watt microwave, it took 3 min. 20 sec. to cook a tray.
- Keep an eye on the chips; they can go from perfect to burnt pretty quickly. You want them to have scattered browned spots, but not be browned all over.
- Microwaves can have hot spots in different places. If yours doesn't cook evenly, some chips may be done before others. If so, stop and remove the browned chips, and continue cooking until all of the chips have browned.
- The microwave tray instructions say you can stack and microwave 2-3 trays at a time. However, you have to increase the cooking time by a minute for each tray, they don't cook and crisp as evenly, and you can't see all of the slices on the bottom tray to check for doneness. I prefer to cook one tray at a time. While one tray cooks, I'm loading up the next one.
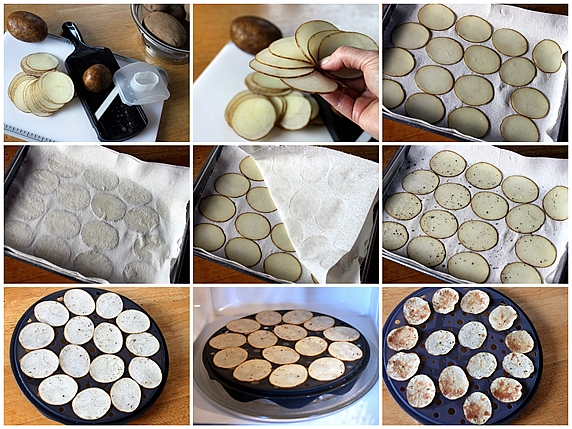
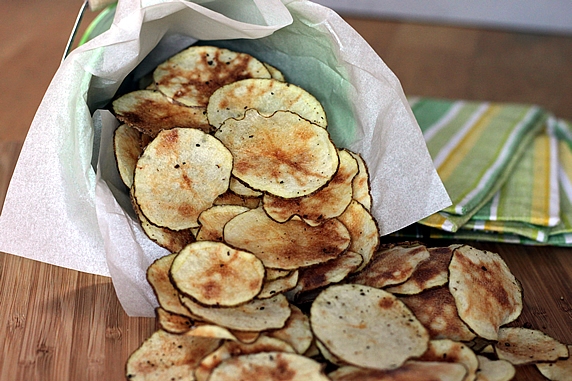
Step 7. Move the cooked chips to a wire rack to cool. They cool quickly and get crispier as they cool. They're ready to eat within minutes.
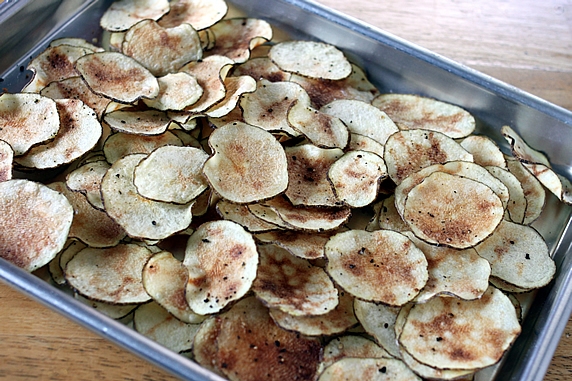
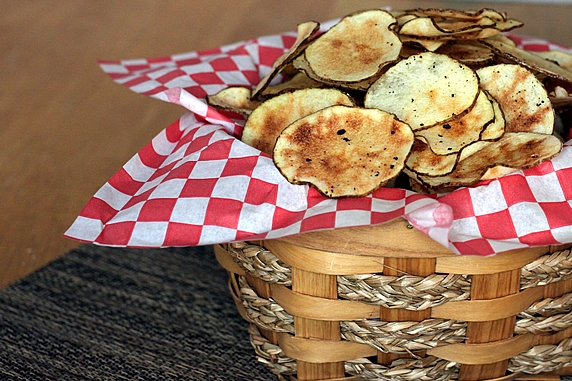
Here are the chips I made from 3 potatoes. It took about 30 minutes to make approx. 6 servings.
Cooking spray, or not? The first time I tried making these microwave chips, I sprayed them with canola spray before cooking them. I thought they'd need that trace amount of oil for flavor and to make the salt and seasonings stick. Then I tried a batch without the cooking spray. Turns out that the seasonings stick just fine without the cooking spray. I did a blind taste test with King-Man as my taster. He could hardly tell any difference, but actually preferred the chips that hadn't been sprayed with oil. I was shocked! So my conclusion is: no cooking spray needed. That makes these completely non-fat.... YAHOO!
1/3 the calories, drastically reduced salt, no preservatives, and no fat! Look at the image below to see my comparison of a snack size bag of Lay's Classic chips (there were 22 chips in the bag) with an equal amount of Trader Joe's baked chips and my homemade microwave chips. Those numbers are pretty convincing. Maybe the homemade microwave chips will take some getting used to if you haven't tried them before, but for me the trade-off is so worth it. King-Man and I have been eating the baked chips for so long, that we actually prefer them over the fried greasy chips. And, now we're taking another healthy step forward with these homemade fat-free chips. I'm really excited about this discovery.
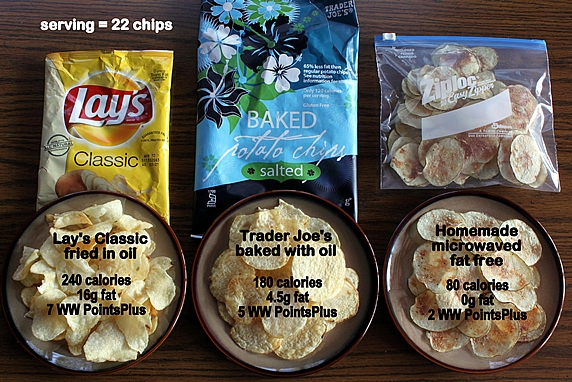
Weight Watchers PointsPlus: 2 pts for 22 chips; 1 pt for 15 chips
Seasoning suggestions. If you don't think the no-oil chips have enough flavor, you can boost the flavor by adding some seasonings.There are all kinds of flavors besides salt and pepper that you can add to these chips. Just sprinkle on any of these before cooking them in the microwave:
- garlic salt or powder
- parmesan cheese (alone or combined with garlic powder and/or Italian herbs)
- dry ranch dressing mix (this makes the chips taste very similar to ranch flavored store-bought chips)
- chili powder, cayenne, or taco seasoning
- curry powder
- dried herbs: basil, oregano, dill, rosemary, etc.
- get creative with your own flavor combos--there are endless possibilities!
Make it a yummy day!
![]()
*ADDITIONAL SEASONINGS may be added before the chips are cooked:
--garlic salt or powder
--parmesan cheese
--dry ranch dressing mix
--chili powder, cayenne, or taco seasoning
--curry powder
--dried herbs: basil, oregano, dill, rosemary, etc.
--get creative with your own flavor combos
Weight Watchers PointsPlus
2 pts for 22 chips; 1 pt for 15 chips