


 Print recipe

This Vanilla Bean Frozen Yogurt has a velvety texture and cheesecake-like flavor. I've honestly never eaten homemade frozen yogurt quite like it.
In a previous post, I shared a recipe for Vanilla Bean Ice Cream that was based on a recipe from Jeni's Splendid Ice Creams at Home. I loved it so much, that I decided to try her unique ingredients and techniques for making frozen yogurt. Once again, I'm totally sold on Jeni's method. It's simply the best.
King-Man and I have been eating this topped with my Microwave Raspberry Sauce, and we've become rather addicted to it.
You'll need an ice cream freezer. If you don't have one, here are two that I have and can recommend:
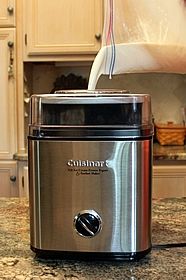
- Cuisinart 2-quart Automatic Ice Cream Maker -- I used this economical model for years. You have to plan ahead a day and place the freezer bowl in the freezer for 24 hours before making ice cream or frozen yogurt. It works great! This one is pictured in use further down in the post.
- Cuisinart 1.5 quart Compressor Ice Cream Maker -- After years of making ice cream and frozen yogurt, I splurged on this pricier option. Because it has a compressor, you can make back-to-back batches without needing to freeze the insert. It's bigger and heavier than the cheaper model, but it's so convenient if you make a lot of ice cream and want to make multiple consecutive batches.
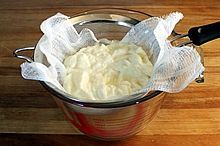
You'll also need to strain the yogurt before making the ice cream. It takes 8 hours to strain the yogurt. If you don't know how, here's a detailed description with photos:
Click to view: How to Strain Yogurt
Step-by-step photos for making
Vanilla Bean Frozen Yogurt
You may notice some duplicate instructions and photos used in my post about Vanilla Bean Ice Cream. The technique and many ingredients are the same.
Step 1. Assemble the ingredients: low-fat yogurt, whole milk, whipping cream, sugar, corn syrup (this is not the icky high-fructose kind), cream cheese, corn starch, vanilla bean or vanilla paste (or you can substitute vanilla extract). Ignore the sea salt in the photo--you don't need it. The yogurt contains enough salt.

3 ways to incorporate vanilla into the recipe:
- Use one whole vanilla bean, cut it open lengthwise, and scrape out the seeds with the tip of a knife. These are pricey; if you can afford them, the flavor can't be beat. Many grocery stores carry these. Or, you can get them from Amazon.
- Use vanilla bean paste. This is a vanilla syrup that contains vanilla beans (see photo on the right below). It's available at specialty cooking stores and in from Amazon. Still pricey, but not as much as the whole beans. This is what I use in this recipe and some baked goods. It's an easy, less expensive alternative to the whole beans. I like having it on hand in my pantry.
- Use vanilla extract. Not quite as good, but you can get great flavor from a good quality vanilla extract. This has the advantage of being more available and less expensive. Of course, you won't get the vanilla bean specks in your ice cream if you use this.

Step 2. Add cream cheese to a large mixing bowl and stir it with a rubber spatula to soften the cream cheese, pressing it against the sides and bottom of bowl to remove any lumps. Set that aside for now.

Step 3. In a small bowl, whisk together the corn starch with some of the milk. Set that aside, too.

Step 4. In a 5 quart pan, combine the remaining ingredients, except the yogurt. Add a vanilla pod and scraped-out beans, if using. Use medium-high heat to bring them to a rolling boil. (NOTE: A "rolling boil" means it is boiling/bubbling vigorously all around the surface, and you can't stir away the bubbling.) Boil for 4 minutes, stirring occasionally.
Step 5. Remove from heat, and whisk in the corn starch/milk slurry.
Step 6. Return to heat and continue to stir for 1-2 minutes; it will thicken ever-so-slightly.
view on Amazon: 10" whisk

(If you're using a whole vanilla bean pod, remove the pod from the mixture and discard it now.)
Step 7. Whisk 1/2 cup of the hot liquid into the cream cheese; whisk until smooth and no lumps are left before adding more liquid. Continue gradually adding and whisking hot liquid until all is combined and smooth.

Step 8. Add yogurt and whisk until smooth.

Step 9. The mixture has to be really cold before it can be added to the ice cream machine. If you want to freeze the yogurt mixture ASAP, here's the way to chill the hot liquid quickly. Pour it into a 1-gallon ziploc freezer bag. I use a baggy holder rack to hold open the bag while I pour. Zip the bag shut--make sure there aren't any leaks.
Step 10. Fill a large bowl 3/4 full with ice cubes and add water (it needs to be heavy on the ice cubes). Immerse the bag of hot liquid into the ice water. Chill it for approx. 30 minutes until the liquid is cold throughout, adding more ice cubes if needed.

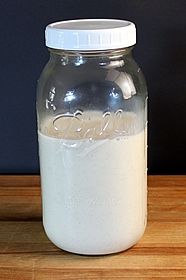
Make ahead tip: You can make the yogurt mixture up ahead, skip the ice water chill down, and chill it in the refrigerator (at least over night) until you're ready to freeze the ice cream. I made an extra batch of the mixture, poured into a 2-qt mason jar, and held it in the fridge for 2 days before freezing it into frozen yogurt. Turned out great.
Step 11. Time to freeze the frozen yogurt. Follow the instructions for your ice cream maker. I removed my freezer bowl from the freezer (it had been there for the required 24 hours), inserted it into my machine, turned it on, and poured in the chilled yogurt mixture.
In my machine, it took 25 minutes for the frozen yogurt to freeze completely. You can see it expand as it freezes and thickens. The finished frozen yogurt has a soft-serve consistency. It's smooth but slightly grainy at this point. The texture gets smoother/creamier/better when you put it in the freezer for a few hours.

Step 11. Transfer the frozen yogurt to a container. Tap it on the counter to remove any bubbles and level it. Cover the surface with a piece of parchment paper (or use wax paper; but, don't use plastic wrap--it can stick in the folds of the ice cream and be hard to remove). Put an air-tight lid on it.
Step 12. Freeze in the coldest part of your freezer for at least 4 hours.
Step 13. When it's time to serve the frozen yogurt, remove it from the freezer & peel off the parchment paper. If it's too hard to scoop, let it sit out for 5 to 10 minutes--that will soften it enough to be scoopable.

If you make frozen yogurt or ice cream frequently, I high recommend these insulated ice cream tubs, pictured below.
view on Amazon: insulated ice cream containers (I love these!)

At last, time to sample this creamy goodness. Look at those yummy vanilla bean specks.

Try adding some berries or other toppings. Here are four of my favorite toppings (recipes in previous posts).


This Vanilla Bean Frozen Yogurt is totally delicious all by itself, too. I'm telling you, it tastes like frozen cheesecake.
Make it a Yummy day!
Monica
- 1 quart plain low-fat yogurt, strained (1-3/4 cups after straining)
- 6 tablespoons (3 oz) cream cheese
- 2-1/4 cups whole milk, divided
- 3 tablespoons cornstarch
- 3/4 cups heavy cream
- 1 cup sugar
- 1/3 cup + 1 tablespoon light corn syrup
- 2 tablespoons vanilla bean paste; OR 1 vanilla bean + 2 teaspoons vanilla extract; OR 2 tablespoons vanilla extract
Add cream cheese to a large mixing bowl and whisk until cream cheese is smooth; set aside. In small bowl, mix 3 tablespoons milk with cornstarch; set aside. In 5 quart pan, combine remaining milk, cream, sugar, corn syrup, vanilla paste or extract; (if using whole vanilla bean, add pod and scraped-out beans). On medium-high heat bring mixture to rolling boil. Boil for 4 minutes, stirring occasionally. Remove from heat, and whisk in the corn starch/milk slurry. Return to heat and continue to cook and stir for 1-2 minutes; it will thicken slightly. Remove from heat. Remove vanilla bean pod, if using. Add 1/2 cup hot liquid to cream cheese & whisk until smooth. Gradually add and stir in remaining hot mixture; whisking until smooth. Add strained yogurt and whisk until smooth.
--To quick chill mixture for making frozen yogurt right away: Fill large bowl 3/4 full with ice cubes and add water. Pour hot milk mixture into 1 gallon freezer Ziploc bag, seal and immerse in bowl of ice water for at least 30 minutes until mixture is completely chilled; add more ice as needed.
--To chill mixture for making frozen yogurt later: Pour it into jar or pitcher, cover, and chill at least over night or up to 3 days.
--To freeze frozen yogurt: Pour chilled mixture into ice cream freezer and freeze according to instruction of your ice cream maker. When finished, pour frozen ice cream into separate container and press a sheet of parchment paper on top. Cover and freeze for at least 4 hours until firm. If it's frozen too hard to scoop, let frozen yogurt soften at room temperature for 5-10 minutes before scooping and serving.
Here's another recipe you might enjoy:
Individual Chocolate Dream Ice Cream Cups

This post was updated July 8, 2018.