

Make-Ahead Turkey Gravy
Lighter, delicious, and ready to reheat on Thanksgiving Day

 Print recipe

I have made in the neighborhood of 60 turkey dinners through the years--twice a year for Thanksgiving and Christmas. I love to cook, but this meal can be pretty stressful and exhausting to make. So much has to be done at the last minute. In particular, there are several things that stress me out about making turkey gravy for a holiday meal:
- It's so last minute, because you have to wait for the turkey to finish cooking before you have the drippings needed to make the gravy.
- I never know if there will be enough drippings to make flavorful gravy. Sometimes there are lots of drippings, sometimes hardly any at all. What's up with that? I don't know why that is, but I don't like that uncertainty. If I'm cooking for a crowd, I need to know there will be enough drippings to flavor a big batch of gravy.
- If I brine the turkey, which I have been doing in recent years, the drippings are salty and make a salty gravy that (a) doesn't taste good, and (b) is bad for King-Man's high blood pressure.
- It's hard to get all of the fat out of the drippings if you have to make the gravy immediately. All that turkey fat grosses me out and hardens my arteries. I want it out of there.
A few years ago, I watched Tyler Florence of the Food Network make his make-ahead turkey gravy. My gravy making life was forever changed. It was a light bulb, duh-why-didn't-I-think-of-that moment. Anything I can prepare ahead of time reduces the stress of cooking holiday meals and increases my enjoyment of the day. King-Man is always in favor of me being less crabby stressed and more happy. He's sweet that way.
My version of make-ahead gravy is almost fat-free. It's hard to find a gravy recipe that doesn't have butter added to it. I love the flavor of butter, but why use it if you can have great tasting gravy without it? I use a small amount of olive oil (a healthy fat); but this recipe is free of saturated fat, because all of the turkey fat is removed from the broth. I'll save my calories for the pies and whipped cream and butter on my rolls. But, that's me. You can add butter to my recipe if you want to. But taste it first without the butter and see what you think. It tastes pretty darn good, in my humble opinion.
Nutritional Information (for one 1/3 cup serving): 41 calories, 1 Weight Watchers SmartPoint. (complete nutritional information at the end of this post, just below the printable recipe)
Allow 2 hours or so to make this. I wouldn't want to do that on Thanksgiving Day. But if you can make it a day or two before, or a week or more before and freeze it, you will be saved the hassle of gravy making on Turkey Day. Mine is already in the freezer and ready for the big meal later this month. Yay!
Step-by-step photos for preparing
Make-Ahead Turkey Gravy
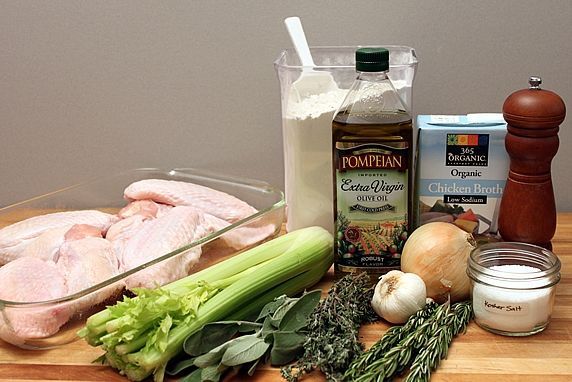
Step 1. Assemble the ingredients:
- turkey wings -- You can use any turkey parts, but wings are usually inexpensive and have a large surface area covered in skin--that makes for good browning and flavor for the gravy. If you can't find them in your store, ask the butcher if they're available.
- flour
- olive oil
- chicken broth (update: Although it's not pictured below, I now use Swanson's Organic 100% Natural Chicken Broth. After reading that it has Cooks Illustrated's #1 rating for best taste, I tried it and agree. It's widely available in US grocery stores. )
- salt & pepper
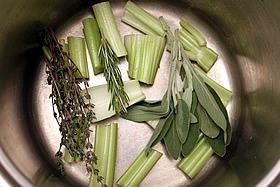
- celery
- onions
- garlic
- fresh sage, thyme, and rosemary.
view on Amazon: Swanson's Organic 100% Natural Chicken Broth
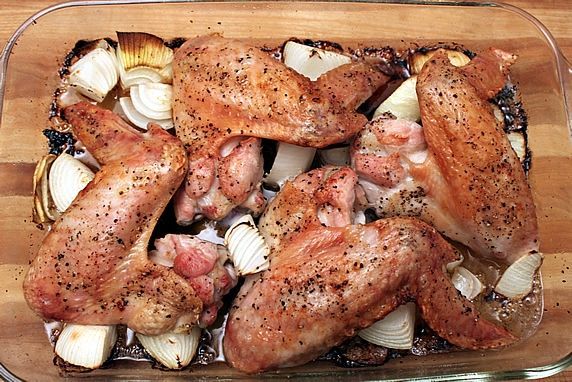
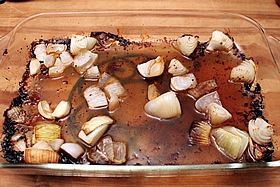
Step 2. Spray a baking dish with cooking spray, add the turkey wings and roughly chopped onions. Drizzle it with olive oil and sprinkle with salt and freshly ground pepper.

Step 3. Bake for an hour. The wings and onions should be browned.
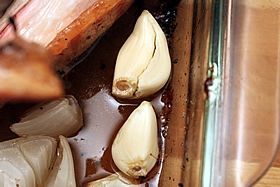
Step 4. Flip the wings over and add the garlic to the pan. Bake for another 15 minutes.
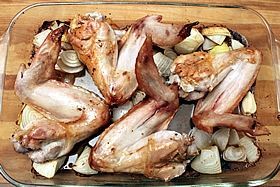
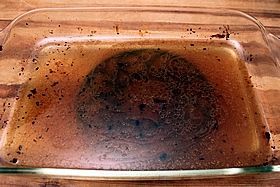
Step 5. Remove the wings to a big pot on the stove top. The onions should be caramelized and there should be a good amount of browned edges and bits in the pan juices. Add the onions and garlic to the big pot. Pour some chicken broth into the baking pan and whisk it around to loosen all of those browned bits. That will give your gravy rich flavor and color.
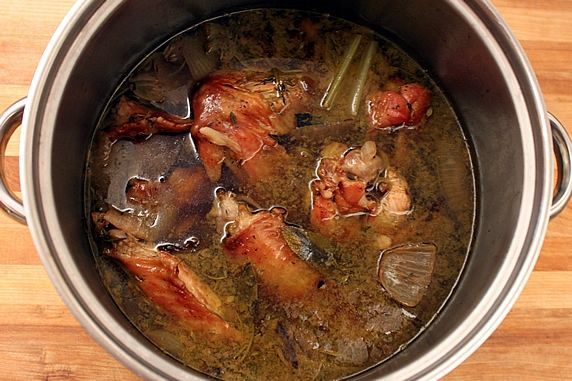
Step 6. In the big pot on the stove, add the celery and herbs along with the cooked wings and onions. Pour in the broth from the baking pan, and then add more chicken broth.

Step 7. Bring it to a boil, then lower the heat and simmer it for and hour or so until it looks like this.
Step 8. Remove all of the solid pieces from the stock. Pour the liquid through a fine wire mesh strainer into a bowl or large measuring cup. This will remove any remaining solid bits from the liquid. There will be gross turkey fat floating around in there and rising to the top. You can try to spoon off as much as the fat as possible, but you can't get it all that way. Here are better ways.
- TIP: You can remove the turkey meat left on the bones and use it in soup or freeze it for future use.
Two ways to remove fat from the stock:
1. Chill the stock in the fridge for several hours. The fat will rise to the top, solidify, and be easy to scrape off and discard. This takes awhile. Hours.
2. Use a grease separator. This is the method I use. Works GREAT, and doesn't require the chill time in the fridge. I've used a couple of other kinds of grease separators, but this one is my favorite by far. It makes it so easy to get every bit of turkey fat out of there. Pour some stock into the grease separator (you'll need to do this in a couple of batches). Let it sit for a few minutes so it can cool slightly and the fat can all rise to top. Look at that layer of gross, gross, gross turkey fat rising to the top. Yuck.
- view on Amazon: grease separator

Hold the grease separator over a bowl or measuring cup, pull the trigger in the handle and release stock into the bowl. Let go of the trigger when the grease gets near the bottom of the grease separator. Discard that gross, gross, gross turkey fat. You are left with dark, rich fat-free stock.
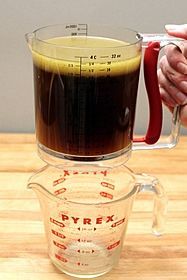

Measure how much turkey stock you have left after removing the fat. I had 5-1/2 cups of stock left. Pour the stock into a sauce pan on the stove-top.
Step 9. Now it's time to make a slurry that will be used to thicken the turkey stock.
Formula for making a gravy slurry: 2 tablespoons of flour for each cup of liquid in the gravy
5-1/2 cups of stock X 2 tablespoons of flour = 11 tablespoons of flour (approx. 2/3 cup)
Pour approx. 1 cup of liquid into a mason jar. You can use additional chicken broth, water, or grab a cup of the turkey stock to use. Then spoon the 11 tablespoons of flour into the jar. (Use a ratio of approx. 1 tablespoon of flour to 1-1/2 tablespoons of water or broth in the jar.)

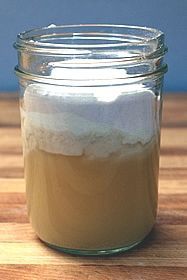
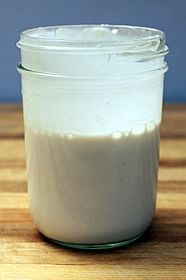
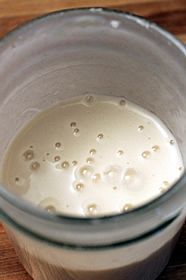
Put the lid on tight and shake that jar like crazy. (BTW, this counts as exercise to help negate all of the calorie laden foods you'll be eating at the big turkey meal.) The result is a slurry that will thicken your gravy.
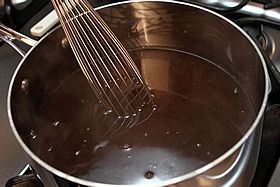
Step 10. Pour the turkey stock into a large sauce pan and heat it until it starts steaming. Use a whisk and start rapidly whirling that stock around. VERY slowly, while you're whisking, pour the slurry into the hot stock.
- view on Amazon: wire whisk

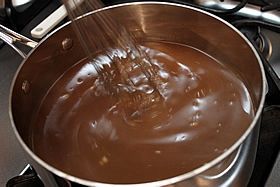
Don't stop whisking. Add the slurry a little at a time until you get the consistency you want. If it's not thick enough, you can make up another batch of slurry--that probably won't be necessary if you follow the slurry formula. Turn the heat down and let it cook for 10 minutes or so to cook the flour and blend the flavors. Add more salt and pepper to taste, if needed.
GOT LUMPS? Fear of lumps keeps a lot of people from even attempting gravy making. Here's a well-kept secret. There isn't a cook out there who hasn't made lumpy gravy at least once. Me? I've made lumpy gravy numerous times. It happens when you add the slurry to the liquid too quickly, without stirring enough, or as payback because you've been naughty sometime in your past. LUMPS HAPPEN. When they do, there is a super simple solution. Pour your gravy through a fine wire mesh strainer into whatever container you're using for storing or serving your gravy. Lumps are gone. No worries. You can also use an immersion hand blender to blast those lumps apart.
- view on Amazon: fine wire mesh strainer, immersion blender (top rated by Cooks Illustrated)
Refrigerate or freeze your gravy. Store in the fridge for up to 3 days or in the freezer for up to 3 months. I like to make a double batch all at once and have gravy in the freezer for both Thanksgiving and Christmas meals. You can use any freezer safe container; I use wide mouth pint mason jars labeled with blue painters tape (sticks well, but easily comes off without leaving sticky residue). Move frozen gravy to the fridge the day before so it can thaw before reheating it.
view on Amazon: wide mouth pint mason jars, white plastic lids for mason jars, blue painters tape

Reheat your gravy on the stove top or in a microwave. Once heated, whisk until it's restored to a smooth consistency.. If it's too thick, whisk in some water or chicken broth.
Serve your gravy in a bowl, gravy boat (with a candle warmer), or tea pot (my favorite). If you use a teapot, remove the tea infusior (if it has one) and fill the teapot with piping hot water for a few minutes to heat up the pot. Then pour out the water and fill it with hot gravy. The teapot will keep the gravy much warmer than an open gravy boat or bowl, and it's really easy to pour gravy from the teapot. To keep it warm longer, use a tea pot warmer.
- view on Amazon: tea pot, tea pot warmer, gravy boat with candle warmer
More make-ahead recipes! Pour this awesome gravy over these other yummy, stress-reducing holiday recipes:
- Step-by-Step Guide to the Best Roast Turkey
- Make-Ahead Turkey
- The Best Soft White Dinner Rolls
- Slow Cooker Mashed Potatoes
- Green Bean Casserole with Bacon and Gruyere
- Make-Ahead Cornbread Stuffing
- Cornbread Stuffing in a Bundt Pan
- Easy 10-Minute Cranberry Sauce
I also have a recipe for making turkey from pan drippings on the day of the meal, after the turkey comes out of the oven: The Best Turkey Gravy
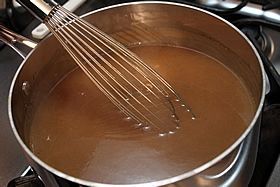
Look at this delicious gravy. It has great color and rich taste. And it's virtually FAT FREE. 
I love having my gravy cooked and ready LONG before the meal. Goodbye stress!
Good Gravy, are we going to have a Happy Turkey Day, or what?
Make it a Yummy day!
Monica
- 4-5 lbs. turkey wings
- 2 medium onions, peeled & each cut into 8 pieces
- 2-3 tablespoons olive oil
- 1-1/2 teaspoons salt (divided)
- 3/4 teaspoon ground black pepper (divided)
- 2 garlic cloves, peeled
- 2 quarts low sodium chicken stock, divided
- 2-3 sprigs fresh sage
- 2-3 sprigs fresh thyme
- 2-3 sprigs fresh rosemary
- 3 celery stalks, each quartered
- 2/3 cups flour
*To thicken gravy, for each one cup of turkey stock make a slurry of 2 tablespoons of flour to 3 tablespoons of water or broth to shake together in the jar.
STORE GRAVY in the fridge for up to 3 days or in the freezer for up to 3 months. Move frozen gravy to the fridge the day before so it can thaw before reheating it. Heat and whisk it until smooth. If it's too thick, whisk in some water or broth.
REHEAT GRAVY on the stove top or in a microwave. Once heated through, whisk until it's restored to a smooth consistency. If it's too thick, whisk in some water or chicken broth.
NUTRITIONAL INFO (for one 1/4 cup serving): 31 calories, 1.2g fat, 3.8g carbs, 0g fiber, 1.1g protein; Weight Watchers PointsPlus: 1
Only 1 Weight Watchers SmartPoint per 1/3 cup serving!
