

DIY Etched Glass Tutorial
How to etch letters & words on glasses, jars, bottles, & more

Awhile back on Pinterest, I saw this idea for etching glass and immediately repinned it to my "DIY--Things to Make" Pinterest Board. It looked like a fun project with all kinds of home and gift possibilities. The Pinterest instructions linked to Martha Stewart's website. It sounded pretty easy, so I was anxious to give it a try.
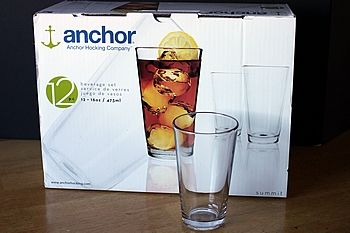
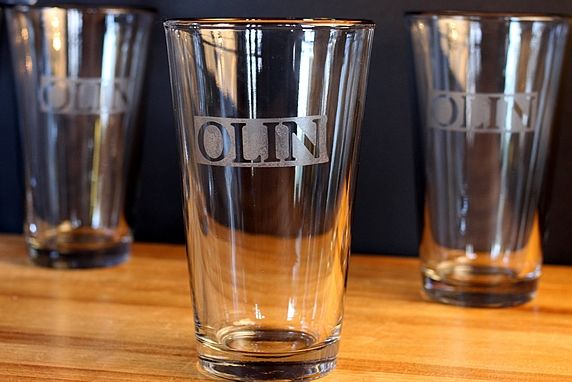
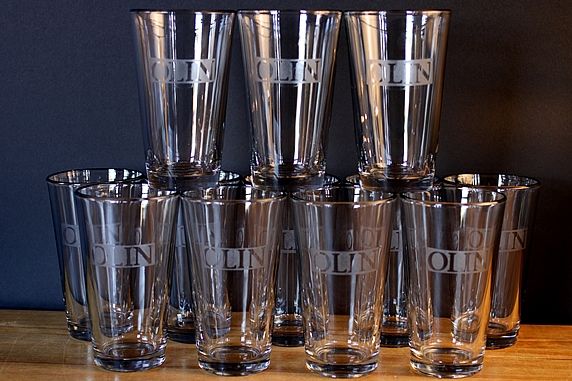
Last week as I started preparing for an upcoming party for King-Man's MBA students at the Washington University OLIN School of Business, I thought it would be fun to etch "OLIN" on glasses to give our guests as a party favor. The party will be a beer/food pairing dinner (more about that in an upcoming post), so I purchased pint glasses for etching in keeping with the beer theme. These are standard 16 oz glasses that can also be used for water glasses or any beverage.
The bad news: My first few tries didn't look nearly as good as Martha's examples on her website. Her tips were helpful, but incomplete. I had several boo-boos. Fortunately, I practiced on some jars I pulled out of my recycle bin; so no harm done.
The good news: After considerable googling and reading online, I found additional tips and figured out some things on my own. I'm now happy to say that I can etch on glass and get consistently good results every time. After I got through my trial-and-error, I found etching on glass very easy to do.
I'm compiling all of my tips and lessons learned in today's post.
Step-by-step photo tutorial for DIY Glass Etching
CLICK HERE
for a printable pdf of these photos and instructions
Step 1. Assemble these supplies:
- Etching cream -- I used Armour Etch. It's available at craft stores like Michael's. You can also get it on Amazon. (view on Amazon)
- Glass cleaner -- Isopropyl rubbing alcohol is recommended over the Windex-type glass cleaner pictured below. This is a tip from my friend Paul who is experienced in etching glass. He says that common glass cleaners may have additives that leave an almost invisible film that may cause uneven etching and limit the mask adhesion. (Thanks, Paul!)
- Blue or green painters tape -- look for it at home improvement stores; regular masking tape isn't recommended (view on Amazon)
- Plastic gloves (view on Amazon)
- Popsicle sticks -- most etching instructions recommend using paint brushes; popsicle sticks work much better, and they can be tossed when you're through--no clean up! (view on Amazon)
- Sticker letters -- I used some old Creative Memories scrapbooking stickers that I had on hand. You can purchase alphabet stickers in lots of places like Target, Walmart, craft stores & Amazon. They come in lots of fonts & sizes. (view on Amazon)
- Drop cloth (or similar protective covering) --available at home improvement stores with painting supplies; spread it out to protect your work area from the acidic etching cream. (view on Amazon)
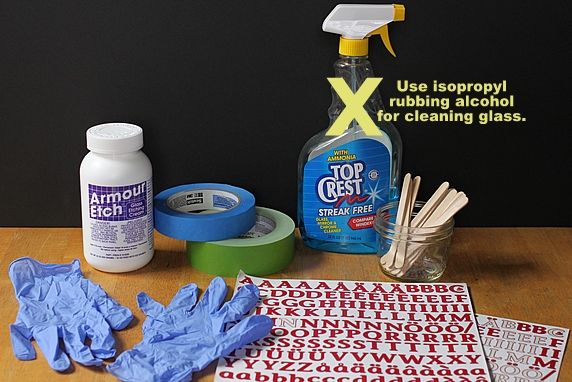
- Glassware. You can etch on most types of glass, except some glass Pyrex bakeware that has been tempered for high heat (this is according to the etching cream company). These are the glasses I used (view on Amazon).
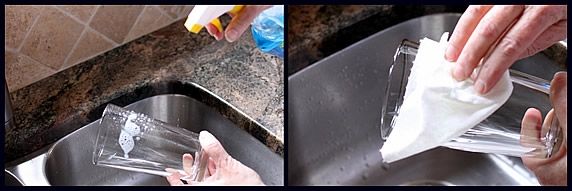
Step 2. Clean with isopropyl rubbing alcohol to get a squeaky clean surface on the glasses--they must be free of fingerprints and smudges. Dry them thoroughly. (Don't use a Windex-type glass cleaner as is pictured here. See explanation in supply list above.)
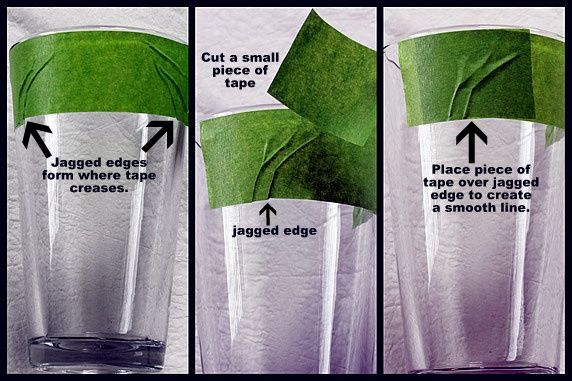
Step 3. Adhere a piece of tape to the top of the glass. The tape serves two purposes: (1) It protects the glass that you don't want to get etched, and (2) It provides a straight line to use as a guide for placing the sticker letters. I aligned the top of the tape with the top of the glass, so that the bottom of the tape would provide a straight line to use as a guide for placing the sticker letters where I wanted them on the glass. You can cut the width of the tape or add another row of tape in order to position the letters on the glass where you want them.
Step 4. Due to the tapered curve of the glass, the tape wrinkled as I adhered it to the glass and resulted in a jagged lower edge. That edge needs to be smooth in order to have a smooth top edge on the etching. I placed an additional smaller piece of tape along the lower jagged edge to create a smooth line, as pictured below. NOTE: If you're etching a flat piece (like a square jar), you won't have this problem.
Step 5. Place the letter stickers slightly below the bottom edge of the tape. It's easier to handle and position the stickers if you attach them to a thin, pointed extender like an Exacto knife, a long needle, or something similar.
- Be patient. Attaching the letters is the most tedious part of the whole process; but it really pays to take your time here. Get them on straight, and your glasses will look like they were etched by a pro!
- How to center a word: If you're etching on a piece that necessitates centering the letters, first adhere the center letter(s) of the word, and then add letters to either side, as pictured below. My glasses were round and plain all the way around, so centering wasn't necessary for this project.
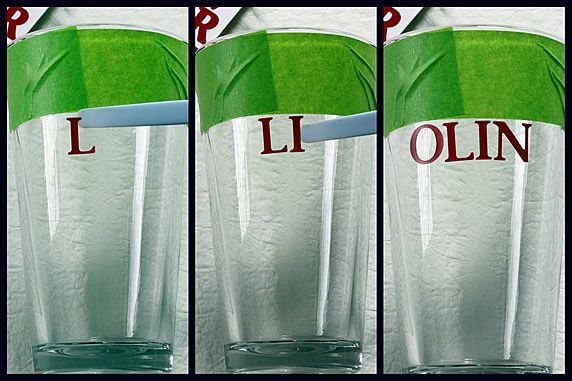
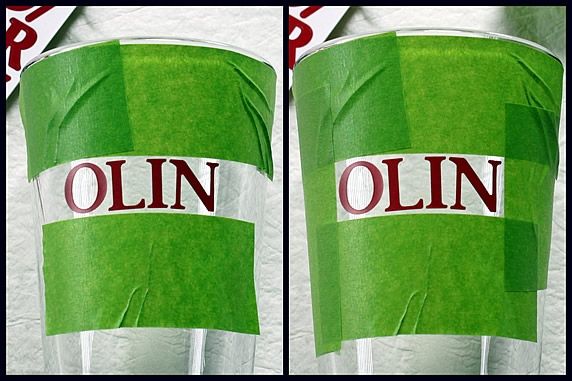
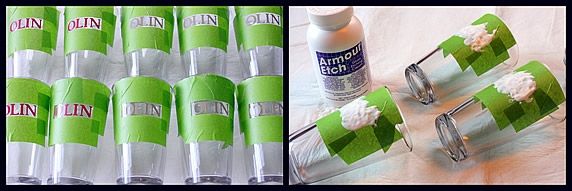
Step 6. Add tape along the bottom and on each of side of the letters. Be careful to place the tape on straight and at an equal distance from the letters on all sides. All of the glass that is exposed inside the tape will be etched; so take your time and reposition the tape, if necessary, until you get it right.
- Don't etch large areas: The etching is most successful when there is a very small border area around the letters. You can see that I taped very close to the letters. Etching cream doesn't work consistently on large solid areas. The glass doesn't always etch evenly, and the imperfections are much more obvious in large areas. I'll show you an example of this further down in the post.
Step 7. Firmly press down the tape and sticker edges using a cloth or paper towel; or, you can use your fingers if you're wearing a plastic glove. Make sure the sticker and tape edges are firmly stuck so that no etching cream can get underneath them. Don't use your fingers or you will get fingerprints on the glass. Remember...the glass must be free of fingerprints and smudges in order for the etching cream to work properly.
Step 8. Put on plastic gloves. This is absolutely essential! The etching cream is an acidic chemical that shouldn't come in contact with your skin or eyes. Read the safety precautions on the container. Wear protective clothing and eye protection.

Step 9. Use a popsicle stick to apply etching cream in a thick, even coat. A brush is usually recommended for this step, but it's easier and faster to apply a thick coat with a popsicle stick.
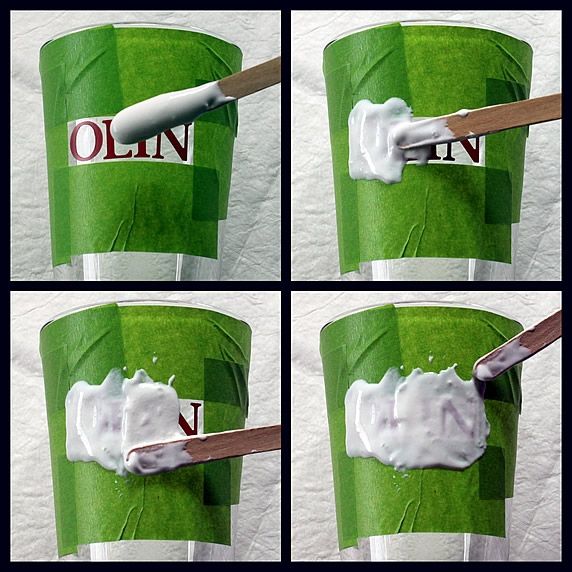
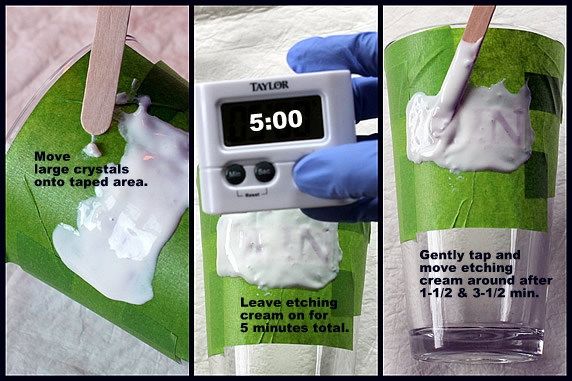
Step 10. The etching cream may have some visible crystal chunks; these are a necessary part of its chemistry. However, the etching result can be blotchy and uneven in the areas with crystals. You can remedy this by using the popsicle stick to guide any large crystals away from the area being etched and onto the taped area. (see photo below)
Step 11. Leave the etching cream on for 5 minutes. (I use a timer for this.)
- About the timing: The etching cream company instructions say to leave the etching cream on for only 1 minute. I didn't find that to be nearly long enough to get a good, solid etched result. 5 minutes was exactly right. BTW, I tested leaving it on for 10 minutes and got the exact same result as with 5 minutes. So, there's no benefit to leaving the etching cream on any longer than 5 minutes.
Step 12. Twice during that five minutes, after approx. 1-1/2 minutes and 3-1/2 minutes, use the popsicle stick to gently tap and swirl around the etching cream. This redistributes the cream in case there are any air pockets or crystals that are creating spots or uneven etching. Be gentle--you don't want to loosen the tape or stickers.
- This step makes all the difference. I only tried this intermittent tapping and swirling of the cream after several bad etching tries that were blotchy and uneven. This simple adjustment completely fixed the problem. Every glass etched perfectly once I started doing this.
Step 13. Wash off the etching cream under hot tap water, using your gloved hand to wipe it away. The heat of the water makes it easy to pull off the tape and stickers.
- Safe for some sinks, not for others. You can wash the etching cream off directly into a stainless steel sink without harming the sink. If you have a porcelain sink, place a bucket or tub in the sink and wash the cream off into the bucket; because the etching cream can harm the surface of glazed sinks.
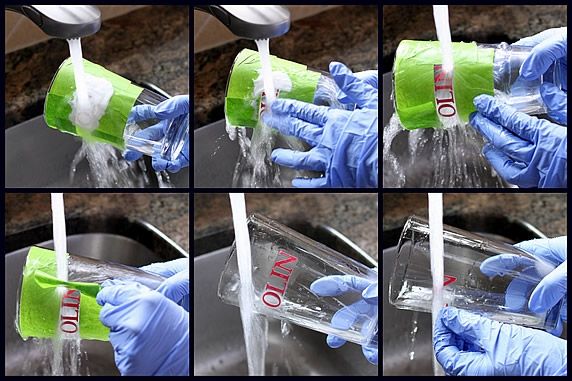
Dry it off, and the glass is ready to use.
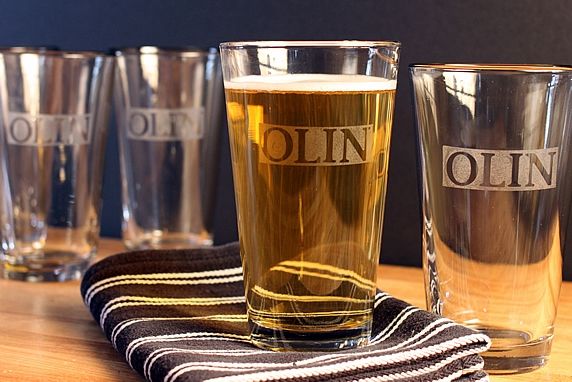
It's permanent! The etched surface is permanent and dishwasher safe.
Practice first. If you decide to try etching on glass, I recommend that you practice on an old jar or something you won't mind discarding. I'm sure glad I didn't ruin one of my good glasses in an early practice round.
Efficient, time saving tip. If you are etching multiple pieces, it progresses faster if you do all of the taping and sticker application on every piece first. Then you can shift gears to applying the etching cream. I found that I could apply the cream to 3 glasses at a time, wait five minutes and start rinsing them off in hot water. It's okay if the 2nd and 3rd glasses have the cream on a little longer while you're rinsing the glass before them.
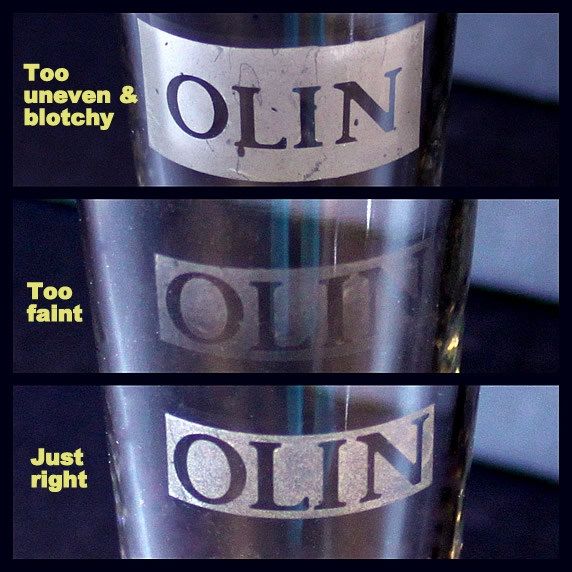
Troubleshooting tips (refer to photo below):
- Uneven and blotchy. This is because (1) I made the space around the letters too wide (making the unevenness more obvious), and (2) I left the etching cream on for 5 minutes undisturbed (allowing air pockets and crystals to create spots and lines). I remedied both of these problems, as explained in Steps 6 and 12 above.
- Too faint. The first time I tried etching a glass, I followed the manufacturer's advice and left the etching cream on for 1 minute. That wasn't long enough. The etching was so light that I could hardly read it. I remedied this by increasing the time to 5 minutes, as explained in Step 11 above.
Here's my set of 12 glasses. I don't think anyone would know that the etching wasn't done professionally if I didn't tell them.
These could be adapted for so many gifts. There's no limit to the ways they can be personalized for birthdays, weddings, and special occasions. Glasses, jars, candle holders, vases...so many possibilities. Designs can be added by using silhouette shaped stickers (flowers, leaves, circles, etc.), or you can cut your own stickers or stencils out of contact paper or adhesive vinyl sheets.
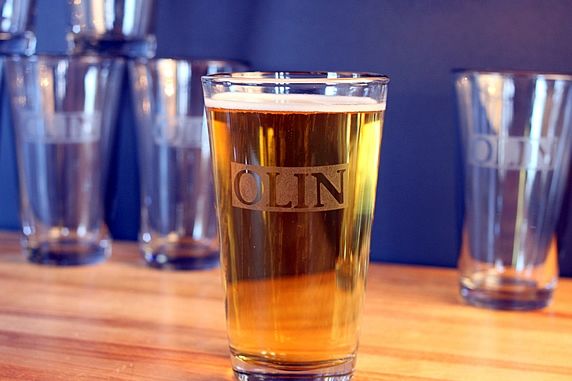
These will be fun to give to our party guests. Cheers!
Make it a Yummy day!
Monica
UPDATE --
See below how Yummy reader Cecilia used this tutorial to etch names onto mason jars for a bachelorette party. After etching the jars, she turned them into drinking glasses with straws following these instructions: Turn A Mason Jar Into A Spillproof Cup With A Straw. What a clever, awesome idea! Thanks for sharing your photos, Cecilia.
- view on Amazon: pint mason jars

Additional online information about etching glass:
- Create your own designs and cut custom stencils for etching from Make It and Love It.
- Custom etched designs on vases and pitchers from Creative Highs.
- Etched storage jars from Martha Stewart.
- Etched glasses from Martha Stewart.
- Etching glass--tips for cutting stencils from Sunset Magazine.
- YouTube video, how to add letters and shapes to etched glass.