The Yummy Life

Sea Salt Caramel Gift Ideas & Printable Tags

Subscribe to my newsletter:
and get a free eBook instantly
Share this with your friends:

TeaserIMG_7286.jpg

T-Man was home for Thanksgiving. He flew back to San Francisco last night, and we have an empty nest again. Time to readjust. One holiday ends and it's time to dive into the next one. That means getting ready for gift giving.  

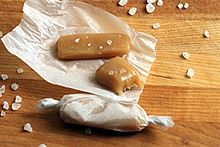
A whole lotta cookin' went on in my kitchen in the past week. In addition to all of the Thanksgiving fare, there were these addictive, delicious Sea Salt Caramels that I blogged about last week. I have to name these the winner for easiest recipe that tastes like I went to a lot of trouble. One bowl and 6-7 minutes in the microwave and they're done. I still have a hard time believing that's even possible. I've made 9 perfect batches now. It's possible.

Click here for Microwave Sea Salt Caramel recipe

IMG_7217.png

T-Man and his friends couldn't stop eating these caramels. Seriously, who doesn't love caramel? I've also received lots of happy feedback from readers about this recipe, and it sounds like a number of you want to give these caramels as holiday gifts. Well, me too! Caramels are universally loved, and these are so easy to make. It's hard to think of a better homemade gift.

My original post with the sea salt caramel recipe shows several ways to jazz up the caramels with chocolate, sprinkles and nuts. Those are pretty and fun to serve on a party platter. But for gift giving, I prefer to wrap the plain salted caramels in pieces of parchment paper so they can easily be put in a jar, bag, or other container. You don't have to worry about the wrapped caramels sticking to each other or getting too warm and losing their shape.

Gift Packaging Ideas
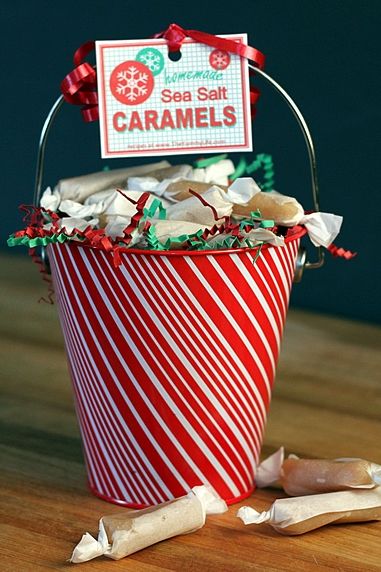
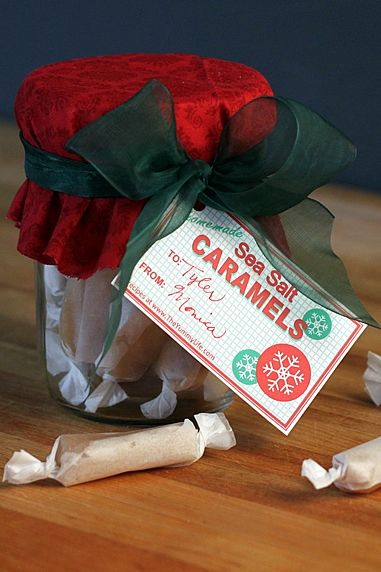
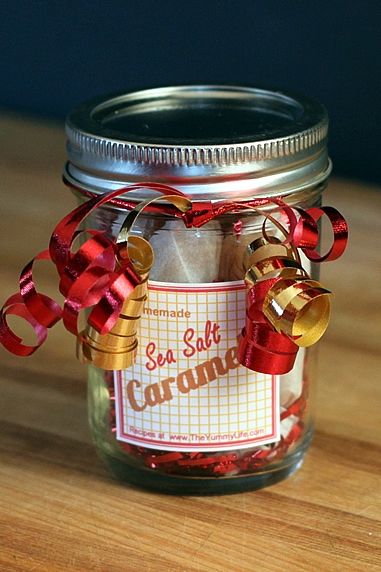
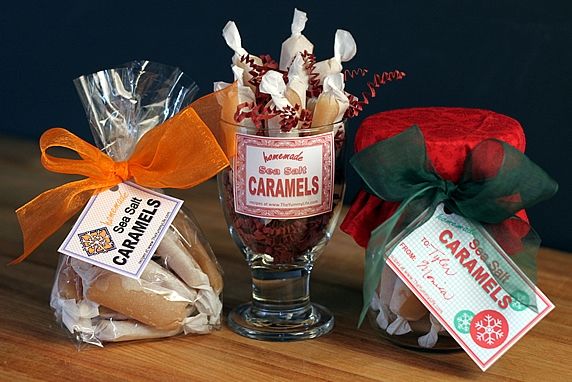
Here are some easy, festive, inexpensive ways to bundle up the caramels for gifts.

Tins, buckets & baskets. I got this red & white striped metal bucket in the dollar bins at Target and added some red & green paper shreds. The tag is tied on with curly ribbon.  

IMG_7311.jpg

Cellophane bags are easy and inexpensive. All you need is a ribbon, and your gift is complete. (Click here for Amazon link to cellophane bags.)

IMG_7297.jpg

Drinking glasses and mugs are reusable containers for caramel gifts. I added some colored paper shreds to this small pedestal drinking glass. The tag looks like it's stuck on the glass, but it's not. I inserted it inside the glass; the curve of the glass magically holds the tag in place.

IMG_7307.jpg

Mason jars are always a versatile, inexpensive choice for a candy gift container. I cut a circle out of red fabric and tied it on with a green ribbon--easy and festive.
(Click here for Amazon link to wide-mouth pint mason jars.)

IMG_7314.jpg

Here's a smaller mason jar with a tag stuck to the outside of the jar with double-stick tape. I added a few metallic red shreds with the caramels inside the jar and tied the rim with curly ribbon. (Click here for Amazon link to 1/2 pint mason jars.)

IMG_7301.jpg


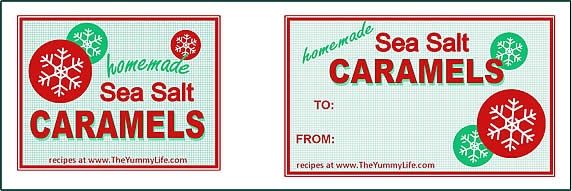
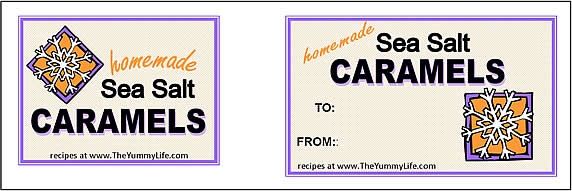
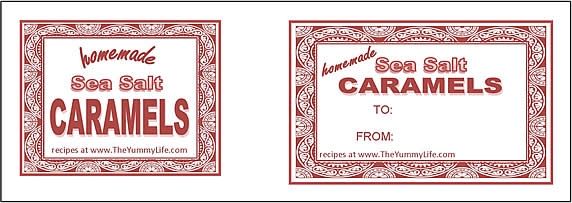
Download printable gift tags

I made 4 different tag designs for the caramels. There are a couple of designs with Christmas and winter themes, plus two neutral designs for use any time of the year.

To use the tags:

  • Print these on card stock, cut them out with scissors, punch a hole in the corner, and hang them from a ribbon or string. 
  • Print them on sticker paper and stick them to your gift. Or, stick them on with tape.

If you don't have a printer or specialty papers, you can have a store with printing services download and print them for you.  

To download and print a full sheet of tags,
simply click on the desired image below.
(There are 4 designs to choose from.)

DESIGN #1:
Caramel tags-red snowflake.jpg

DESIGN #2:Caramel tags-purple snowflake.jpg

DESIGN #3:
Caramel tags-border.jpg

DESIGN #4:
Caramel tags-brown.jpg


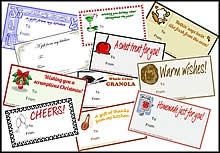
Want more tag options?
Here are 18 more tag design choices suitable for gifts from your kitchen.
(click on image for link to tags) 

Multi Gift Tags border-thumbnail.png


Homemade caramels will be a WOW of a gift. (You don't have to tell anyone how easy and inexpensive they are!) It's way easier to whip up a batch of these caramels than to fight the crowds at a mall. Let me know if you'll be giving these caramels or other homemade gifts for the holidays. I always love hearing from you.

IMG_7290.jpg

Make it a yummy day!

Share this Recipe


Posted on Tuesday, November 29th, 2011
Subscribe to my newsletter and get a free eBook!
Enter your email address below and I'll send new recipes from the Yummy Life directly to your inbox (about one per week). I'll also start you off with a free copy of my eBook: 21 amazing and healthy salad and dressing recipes.
We NEVER spam or sell your information.


Post a comment
15 Comments
Sheri says:
Remember the cookie cutter/fudge idea we had for gifts a couple of weeks ago? I'm so doing these caramels instead. They look waaaaaay easier and quicker. Thanks for the fun tags to go with them!
Reply Posted 2 years ago
Monica says:
I know! These are definitely easier. I'm bringing you & Danny a sample of the caramels when I see you tomorrow. (I need to get them out of my house. No willpower!) I do still like the cookie cutter/fudge idea. May have to play with that one, too. Remember all of those cookie cutters I bought??? Gotta do something with them. :-)
Reply Posted 2 years ago
Sheri says:
You're bringing us a sample??? YUMMMMM!!!
Reply Posted 2 years ago
steffani says:
Thanks soo much!  Have the recipe out on the counter and all the ingredients.  Just waiting for the time to try these!  They look YUMMY!  And, planning on giving them as gifts, too, if they come out as perfect as yours!  Lucky Sheri and Danny for getting samples!
Reply Posted 2 years ago
Monica says:
Hi Stef--You might want to read my response to Susan's comment below and see if you may need to adjust the cooking time based on the wattage of your microwave. I got lucky and used the perfect cooking time in my microwave on the first try. Hope you're successful, too. :-)
Reply Posted 2 years ago
Susan Forehand says:
Hi, friend!  So, I tried the caramels this weekend...KNOWING that David would be all about these! And the only question I have is that they are really a little harder than I'd like....was expecting them to be a little more chewy....although we don't want them to pull out dental work...so I made D promise not to chew! :) Even at room temp they are almost like hard candy.  Wonder if I "over microwaved"....was very careful to follow times...but I know microwaves are different.  Do you think that is the issue?  You are the master! :)  And I love the tags...thanks so much for the greatest recipes and ideas!! Hugs to you!
Reply Posted 2 years ago
Monica says:
Hey Susan! So happy to hear from you. Sorry your candy turned out too hard. It shouldn't be hard and put your dental work at risk. Mine is soft and chewy when eaten at room temp. You are the second person I've heard from who had this problem, although others have not. So I'm going to do some experimenting tonight and see if I can figure out the solution. I'm guessing it's a different in our microwaves and you need to shorten the cooking time in yours, but I want to be sure. I'll be back in touch tomorrow. In the meantime, tell David to hold onto his teeth. :-)

P.S. I spent the day helping Sheri pack up at Loopy. The whole crew there sampled my caramels and loved them. They really are yummy, once you get the texture right. We'll get this figured out!
Reply Posted 2 years ago
Monica says:
Hi Susan. I'm back after more experimenting with the caramel recipe. Here's my conclusion: your microwave is cooking at a higher temp than mine (probably yours is a higher wattage than my 1100 watt). In my microwave, I had soft, chewy caramels with 6 min. total cooking time; and firmer but still chewy caramels after 7 min. However, at 8 min., my caramel was hard and very difficult (almost impossible) to cut. I think it's safe to conclude that you can get softer caramels by reducing the cooking time in your microwave. I'd advise trying a total cooking time of 5 minutes for starters, and see if that gives you the chewy result you're looking for. I know the trial and error is a pain, but it will be worth it once you figure out the correct time in your microwave. This will be the easiest candy you've ever made once you know exactly how long to cook it. If you try it again with better results, I'd love to hear what you did--that could be a help to other Yummy readers who may encounter the same problem.

Hope this helps...and saves David's teeth! :-)
Reply Posted 2 years ago
Kelli says:
I've been waiting to make this recipe for a couple of weeks now.  I have a 900 watt microwave, and per the link you provided it says to cook for 7 minutes and 20 seconds.  So I'm going to try it out at 7mins total just to be on the "safe" side.  I totally love caramels and especially the salty/sweet of sea salt and caramel, so I can't wait to try this out.  I'll post how it turns out the first time.  Hopefully it will be a hit (at least with me!).

I'm hoping to add these to a cookie gift I'm giving to my neighbors and friends this weekend.
Reply Posted 2 years ago
Monica says:
Hi Kelli--I'd love to hear how your caramels turn out, and how the timing works in your microwave. Happy cooking! :-)
Reply Posted 2 years ago
Kelli says:
well.....they didn't firm up.  I cooked all ingredients in a 900 watt microwave to 7 mins 20 seconds per the microwave conversion chart link you included in your recipe post.  I poured them into silicone ice cube trays and the rest into a greased 8x8 pan.  I first stored them in the fridge for over 2 hours, then stored the ice cube tray ones in the freezer for over 2 hours and they never firmed up enough to pop off of the trays.  I had to run a butter knife around the inside edge of each mold and they very quickly lost their shape.

I figured it was due to the ingredients not being cooked long enough.  Maybe I need to cook the mixture to 9 minutes total?  Don't know...I didn't want to overcook the mixture and have them come out hard and brittle, so I figured I'd start at the conversion chart which said 7 mins 20 secs for a 900 watt microwave.

I was sooooo hoping these would have turned out the first time based on your info in the post.  Thanks for asking :)
Reply Posted 2 years ago
Monica says:
What a bummer, Kelli. I'm sorry to hear that your first batch didn't turn out. Dang it. I hate it when that happens--wasted hassle and ingredients. I've had many cooking mishaps like yours, and it isn't fun. :-( It does sound like your caramels were undercooked. I'm guessing you'd need to add a least another minute to the cooking time. In my microwave the caramels are good at both 6 and 7 minutes...so there is at least a 1 minute margin of error. Thanks for the feedback and letting me know your experience with the recipe. Let me know if you try again.
Reply Posted 2 years ago
Kelli says:
I agree; I do think it was the cooking time that was the problem.  I'll try these again at 8mins 30 secs and see what happens.  I don't think I'll want to go more than 9 minutes max.  I'll let you know when I try again.
Reply Posted 2 years ago
Barbara says:
I love this recipe for Sea Salt Caramels.  I first tasted them when we worked together that day at The Loopy Ewe.  I have already made three batches, and given them away as early Christmas gifts....everyone loves the combination of salt and sweet.  Also downloaded the labels which are great.   Thanks for sharing your cooking skills....you are the BEST !
Reply Posted 2 years ago
Kelli says:
Hi Monica,

Update on making these delicious yummies:  I cooked them to 8 mins 30 seconds in my 900 watt microwave and they came out FANTASTIC.  I have a cute silicone half-circle ice cube mold that I'd like to try, but not today.

I'm going to make another batch and use the square glass baking dish covered in foil and sprayed with oil.  I'l going to stir in some chopped pecans with this second batch later today.  

I will definitely wrap this batch in the parchment paper as they do flatten and spread thus losing their shape if just stored in an airtight container.  I did store them between layers of wax paper so that they would not stick, but  I think wrapping them will be great to serve on a treat table.

Love this recipe, thanks for sharing!
Kelli
Reply Posted 2 years ago


Let's hear what you have to say
Hi, I'm Monica...
Thanks for stopping by! This is a place to chat about the good things in life with a focus on fun, easy, healthy recipes and an occasional yummy splurge thrown in.
Read more about The Yummy Life
Free Email Updates!
Subscribe to my weekly newsletter, and I'll send you a copy of my eBook for FREE!
You'll receive about one email per week with my new recipes and ideas. We NEVER spam or sell your information.


Home    |    Recipes    |    Archives    |    About The Yummy Life    |    Contact    |    Community Discussion Group
Privacy Policy - © 2013 The Yummy Life - All rights reserved