

Choose-Your-Stone-Fruit Jam | 3 Ingredients with No Pectin
One multi-tasking recipe for peach, nectarine, plum, apricot, or cherry jam for refrigerator, freezer or canning.

 Print recipe

There's a simple formula for making jam from any stone fruit (meaning fruit with a stone-like pit in the center). There's no need to hunt through lots of cookbooks for the fruit you're using, this one recipe fits all.
You only need 3 ingredients to make fantastic jam: fruit, sugar, and lemon. That's it. The easy method of boiling the mixture until it thickens is all there is to it. There's no need for pectin or preservatives. The use of zest and juice from a lemon brightens the jam's flavor and contributes natural pectin for gelling. Like my Choose-Your-Berry Jam from a previous post, this simple recipe let's the fruit flavor take center stage, although you can add spices or flavors, if you like (find suggestions further down in the post). This jam is simple, flavorful, and shelf stable to enjoy throughout the year.
The only jam recipe you'll ever need for refrigerating, freezing, or canning. I have tested this jam formula for a variety of berries and fruits. After 15 batches of jam without a single fail, I'm confident in sharing this recipe and method with you as the only jam recipe you'll ever need. It simply works for every fruit.
Choose-Your-Stone-Fruit. In this post, I'm sharing this easy formula specifically for making jams with stone fruits. I made 4 kinds of stone-fruit jam and it's hard to choose a favorite:
- peach (or nectarine)
- plum
- apricot
- cherry
These jams are rustic and textured. I like them that way--peels and all. The peel adds color and flavor to the jam. Because the peels soften and disintegrate as they cook, they aren't noticeable in the finished jam. Leaving the peels on the fruit also makes jam-making simpler, easier, and faster. All you need to do is remove the pits, cut the unpeeled fruit into a few pieces, and you're ready to make jam. However, if you prefer a smoother jam, you can peel the fruit and blend it to a smooth texture. My preference, however, is a chunkier, rustic jam with visible bits of fruit.
No added pectin needed. This recipe gels without added pectin. It relies completely on sugar and the natural pectin in the fruit and lemon for gelling. Simple.
Reducing sugar and sugar substitutes may alter the results. One of the main reasons that jam making fails is that many find it hard to resist reducing the amount of sugar in a recipe. No doubt, the recipe I'm sharing would still taste good if it was less sweet. However, sugar plays more of a role than adding sweetness to the jam. Sugar is necessary in order for the jam to gel properly, and it is an important preservative that contributes to jam being shelf stable. So, if you choose to reduce the sugar, know that it could result in a looser jam that won't gel and jam that has a shortened shelf life.
In this recipe, I've reduced the ratio of sugar to fruit as much as I can without compromising the gelling or shelf life of the jam. I'm always in favor of limiting sugar in recipes, when possible. However, in the case of jam, a normal serving of 1 tablespoon only has 32 calories. That's an insignificant caloric price to pay for adding yummy sweet fruit flavor to a piece of toast. It's worth it to me to make a full-flavored, gelled and preserved jam. However, if you need to reduce or eliminate sugar for health or dietary reason, I recommend that you look for a different recipe that is tested to work. Low and no sugar recipes are likely to have added pectin and a non-sugar sweetener (honey, juice concentrate, or something artificial). However, I can't advise you on the results if you try to alter the sugar in this recipe.
Don't double the recipe. This will result in much longer cooking times and the possibility that the jam will gel poorly or not at all.
Great for gifts. I've made some labels you can add to jars of jam to add a finishing touch and make them ready to have on hand for gifts. Who wouldn't love a jar of homemade jam? Look for my printable labels further down in the post. This recipe is suitable for water-process canning; so, you can make them ahead for gift giving.
Step-by-step photos for making
Stone Fruit Jam
(peaches are shown in photos, but any stone fruit may be substituted)
Step 1. Assemble the equipment
- A large pan with a heavy bottom that's as wide as possible; tall, narrow pots don't work as well. Wide pans are preferred because the liquid evaporates faster and the jam gels more quickly; that prevents the fruit from overcooking. You can use a stock pot, Dutch oven, or even a large capacity skillet. It needs to hold 8-10 quarts, because the jam mixture will bubble up and expand when it first begins boiling. For this jam recipe, I found an 8 quart pan to be big enough; but if you have a 10 quart pan, the extra room it makes stirring easier.
Below are 2 pans I've used successfully for jam making. The 10-quart stainless steel pan served me well for many years, although a wider diameter would be better. I recently splurged on the pricey French copper jam pan, and it is amazing--the jam cooks quickly and evenly in it. Admittedly, it's hard to justify the price unless you make a lot of jam; but I love cooking in such a gorgeous piece. It really delivers.
view on Amazon: 10-qt stainless steel stock pot, French copper jam pan

- Flat ended spoon/spatula for stirring jam as it cooks. The flat end makes it easy to scrape the bottom of the pan as you stir to prevent scorching. FYI, if you use a wood/bamboo spatula, cherries and plums may permanently stain it unless you put it in the dishwasher.
- Potato masher for breaking up the fruit as it cooks.
- Candy thermometer. This is optional, but it helps you gauge when the jam is close to it's gelling point.
view on Amazon: flat-end bamboo spatula, flat-end silicone spatula, potato masher, candy thermometer
If you'll be canning your jam, here's the recommended gear (see my post with Step-By-Step Canning Tips for more details on the equipment I use):
- Canning jars & lids--half-pint (my preference) or pint jars for water process canning. For freezer jam you can use plastic freezer jars or freezer safe glass canning jars.
- Water Process Canner. This is a very large pot with a rack in the bottom. For years I used an inexpensive stove-top canner, and it served me well. I recently bought an electric canner, and it is fantastic--highly recommended if you're serious about doing a lot of canning.
- Canning tools. A bubble remover/headspace measuring tool, jar lifter, canning funnel, and large ladle.
Step 2. Assemble the jam ingredients:
- stone fruit of your choice (peaches, nectarines, plums, cherries, apricots--or use a combination for a mixed fruit jam)
- sugar
- fresh lemon (zest & juice)

Fresh or frozen fruit. The important thing is to use fruit that is ripe (but not over-ripe) and flavorful. Often fresh fruit from the grocery store is beautiful but flavorless. Frozen fruit is picked at its peak of ripeness. So, go with frozen if you don't have access to in-season, good tasting fresh fruit. Frozen fruit is already sliced or chopped; however, it normally has been peeled. So, if you prefer to used unpeeled fruit in your jam, using fresh fruit is likely to be your only option (with the exception of cherries).
For this batch of peach jam, I used local, fresh, in-season peaches. However, if I make this recipe when peaches are out of season, I prefer to use frozen peaches. The availability of frozen fruit means you can make this jam any time of the year.
Step 3. Slice the peaches, and cut each slice into approx. 1/2 inch pieces. No peeling necessary! The peach peels add color and texture to the jam. The peels soften and disintegrate as they cook. And, don't worry about the peach fuzz--it disappears as the jam cooks.

Step 4. Add peaches to 8-10 quart pan. Use a Microplane to zest the lemon directly into the pan. Then cut the lemon in half and juice it. Add the sugar.
view on Amazon: Microplane zester, citrus squeeze juicer

Step 4. Put 2 or 3 small plates in the freezer. These will be used later for testing when the jam has gelled.
Step 5. Combine ingredients in large, wide (8-10 qt), heavy bottom pot over medium heat. As soon as the sugar dissolves, increase heat to medium-high. The peaches will soften as they cook.
Step 6. Once the mixture boils, stir it frequently with a flat bottomed spoon/spatula to prevent scorching. Mixture will foam up and expand, and then shrink back down as it cooks more.
Step 7. Allow mixture to boil as the foaming increases and then subsides. Use a metal spoon to skim off remaining foam from the surface. Some batches have a lot of foam that needs to be skimmed, and some have hardly any at all. (The foam is removed because it has a bad taste and appearance in jam jars, and the additional air bubbles make the jam less shelf stable.)
view flat-end spatulas on Amazon: bamboo, silicone

The peaches will soften as the mixture cooks. After the mixture has boiled for at least 10 minutes, use a potato masher to break the peach pieces apart until they're a consistency you like. I like mine chunky and rustic. if you want yours smooth, use an immersion blender to achieve a chunk-free consistency.
- view on Amazon: potato (and fruit) masher, immersion blender

How to know when the jam has gelled enough. I like my jams slightly looser than some--thick enough to be spreadable, but not as thick as jelly. Truthfully, every batch comes out a little differently; there's a range of how much gelling results in a successful batch. (Whew! You can relax about getting it just right.) You can't use cooking time to know when the jam will gel, because the actual time is effected by your cookware, stove heat, and the fruit itself. Here's what I do to make sure it's gelled "enough".
- The visual test. Continue boiling until the mixture thickens to a thin gel consistency. The bubbling slows, and it will look like bubbling lava. Around the edges, the mixture will be thicker and clings to the sides. Below is what two different batches (in two different pans) of peach jam look like when they've passed the other gelling tests explained below. This is when it's time to turn off the heat and pour it into jars. It may take a little practice to know when the jam is ready based on how it looks, so use the methods below along with the visual method to ensure a successful gel.


- The thermometer test. (Optional--If you don't have a candy thermometer, you can rely on the visual and chilled plate tests.) Many jam recipes say to cook the syrup until it reaches 220 degrees on a candy thermometer. However, only jams with high sugar content will reach that temperature without overcooking the jam. For my recipe, I use a thermometer to give me an idea of when to start checking the jam for it's gelling point. When it reads 215 degrees, I use the chilled plate method below to check for proper gelling, but I don't rely on the thermometer reading to tell me exactly when the right time is to stop cooking the jam. Normally for this recipe, a reading of between 215 and 217 degrees is about right.
view candy thermometer on Amazon

- The chilled plate method. This is why I suggested putting plates in the freezer in Step 4 above. When your jam looks visually ready and/or is at 215 degrees, remove a plate from the freezer and drop a teaspoon of hot jam on it. (Remove the jam from the heat, while you're doing the test--if it's at the gelling point, you don't want to keep cooking it.) Return the plate to the freezer for 2-3 minutes and then tilt the plate. If the jam runs down the plate, it isn't ready. Drag your finger through it; if the gap begins to run back together right away, it isn't ready. Continue cooking the jam for 5 minutes and repeat the plate test.
Below is how my peach jam looked when it had gelled properly. It ran very slowly (hardly at all) when I tilted the plate, and the path I made with my finger slowly oozed back together only slightly.

Once the jam is ready, pour it into jars or plastic containers to keep it in the refrigerator for 2 months or the freezer for up to 6 months. Use water process canning if you want to safely store the jam in jars at room temperature for a year.
If you prefer to freeze your jam, Ball makes plastic freezer jars that come in the same sizes as mason jars. Most of Ball's glass jars are freezer safe now, too. Make sure you leave at least 1/2" head space to allow for expansion when the jam freezes. Press a round of parchment paper on top of the jam before screwing on the lid; this will prevent ice crystals from forming in the freezer.
- view plastic freezer jars on Amazon: pint, half-pint
- view freezer-safe glass jars on Amazon: pint, half-pint
Below are step-by-step photos that explain how to can the jam.
CANNING JAM (Water Processing)
- Adhere to canning safety guidelines. It's important to follow the jar preparation and processing recommended by the USDA. If you want more detailed canning information, I recommend the Ball website. They are the ultimate authority, and their site is loaded with detailed information and recipes suited for canning.
- For general canning tips, see my previous post,
1. Prepare the jars & lids. I use half-pint jars for jam, but you may also use pint jars. Wash the jars in hot sudsy water, rinse and dry them. The jars don't have to be sterilized, since the filled jars will be processed for 15 minutes (as per new canning guidelines from Ball). The washed jars need to be hot when they're filled with hot jam. Keep the jars hot in the canner filled with simmering water. Or, my preference is to put them on a tray in an 180 degree oven to keep them hot until it's time to fill them. I think that's easier that juggling them in and out of hot water right before filling them.
The lids and rings should be washed in hot sudsy water, rinsed and dried. The lids do not have to be kept hot in simmering water according to new canning guidelines.
2. Fill the jars. Use a canning funnel and ladle to fill each hot jar with hot jam, leaving 1/4" headspace.
3. Insert a bubble remover down the side of the jar and pull toward the center to release any bubbles (you can use any long, thin object like a chopstick).
4. Clean jar rims thoroughly with a wet paper towel. If the rims are dirty the jars won't seal.
5. Add a lid to each jar. Screw on a ring until it is "finger tight".
- view on Amazon: pint mason jars, half-pint mason jars, canning funnel, large ladle, bubble remover & headspace tool

6. Use a jar lifter to lower each jar vertically into the canner of boiling water. There should be at least 1" of water over the tops of the jars. Cover and return water to a rolling boil. Process jars in boiling water for 15 minutes. Turn off heat and remove lid; leave jars in hot water for 5 more minutes. (I'm using the Ball Electric Canner in these photos.)
7. Use a jar lifter to remove each jar vertically and set on a towel. Leave undisturbed for 12 hours. Within 30 minutes after the jars are removed from the water, you know they've safely sealed if the center of the jar is slightly indented (it shouldn't give when you press it); often you'll hear a popping noise when they seal. If any of your jars don't seal, store them in the fridge and use them within 2 months, or freeze them for up to 6 months.
view on Amazon:
- electric waterbath canner, pictured below (highly recommended for serious canners)
- stove-top waterbath canner and utensil kit (economical option--I used this for many years)
- jar lifter

Store your sealed, processed jars in a cool, dark place (a cabinet or pantry is fine as long as it doesn't get too hot); a basement is ideal.
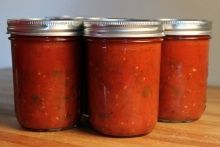
Here's a look look at the finished peach jam. Bring on the toast and English muffins!

Same jam recipe, different fruit.
Follow exactly the same procedure and use the same ingredient amounts to make the variety of fruit jam of your choice. Here are the others I have tried.
Plum Jam. Quarter each unpeeled plum and discard the pit.

Apricot Jam. Quarter each unpeeled apricot and discard the pit.

Cherry Jam. This ones takes longer than the other varieties, because it takes awhile to pit and cut the cherries. I highly recommend using a cherry pitter to speed the task along. After the pits are removed, cut each cherry in half.
view on Amazon: single cherry pitter (pictured below), multi cherry pitter (pits 4 cherries at once)

Mixed fruit jam is easy to make--simply combine any variety of fruits or berries you choose and follow directions using all of the same ingredient amounts in the recipe. Bags of frozen fruits and berries are widely available (look for jumbo bags of them at Costco) and make it easy to whip up a quick batch of jam at any time of the year.
Add spices, herbs, and flavorings, if you like. Me? I prefer to can jam in its simplest form where nothing interferes with the pure, delicious fruit flavor. If I'm in the mood, I'll jazz up an opened jar by stirring in a little something extra like cinnamon, vanilla, or even a diced jalapeno for a hot kick. If you prefer to add extra flavors to an entire batch of jam, here are some possible additions; simply stir these in and cook them along with the fruit, sugar, and lemon mixture. Taste before adding the mixture to jars to make sure you have a desirable balance of flavors; make adjustments as necessary.
- Balsamic Fruit Jam -- add 3 tablespoons aged balsamic vinegar
- Pepper Fruit jam -- add 1 to 3 minced jalapeno or habanero peppers, with or without seeds depending on how much heat you want (this makes a great appetizer spooned over cream cheese and served with crackers); this is particularly good with peaches or apricots.
- Vanilla Bean Fruit Jam -- split open one vanilla bean and add it to the mixture as it boils; remove bean before adding jam to jars
- Thyme Fruit Jam -- add 10 sprigs of fresh thyme to mixture as it boils; remove stems before adding jam to jars
- Ginger Fruit Jam -- add 2 to 4 tablespoons minced fresh ginger
- Cinnamon Fruit Jam -- add 1 to 2 teaspoons ground cinnamon
For a finishing touch, I like to label my jars. That way they're easy to identify on my shelf, look attractive on the table, and are ready for gift giving, too. Jam is universally loved and fun to share. Going to a party? Grab one of these to take as a perfect host/hostess gift. Need a little something for a teacher, co-worker, or neighbor? You can't go wrong with a jar of jam. Give one or several in a gift basket. Print the labels and stick them on the sides or lids of each jar--easy!

Download printable jar labels/tags. These are sized to fit on jar lids (regular or wide mouth) or sides.
- Print these on card stock, cut them out, punch a on top, and hang them from the jar neck with a ribbon, string, or rubber band. OR
- Print them on sticker paper and stick them to the jar or lid. (This is what I do.) Or, print them on regular paper and stick them on with tape.
If you don't have a printer or specialty papers, you can have a store with printing services download and print them for you (Kinkos, Office Depot, Staples, etc.)
Click on the image of your choice to download & print a full sheet of labels/tags.


Cut with scissors or a circle punch. You can cut the round tags out carefully with scissors, or use a circle punch to make the task easier and more precise. I use a 2-1/4" circle punch; it fits both regular and wide canning lids.
view on Amazon: 2-1/4" circle punch (this fits mason jar lids)

Write-on labels are an easy option if you don't want to go to the trouble of printing and cutting your own. These ready-made rolls of labels are sized just right for canning jars and they are dissolvable for easy removal when the jar is empty.
- view on Amazon: Ball dissolvable labels

Those are some gorgeous jars, don't you think? They taste as good as they look. My favorite way to use them is as a spread on toast, English muffins, biscuits or bagels. They can also be added to yogurt, smoothies, tea, or fizzy water to add sweet fruity flavor.


Make it a Yummy day!
Monica
![]()
PREP THE FRUIT: Fruit should be pitted and cut, leaving the peel on.
peaches--chopped in 1/2-inch pieces
plums and apricots--quartered
cherries--halved
COOK THE JAM: Combine ingredients in 8 to 10 quart, heavy bottom pot. A wide, shallow pan works best, if available. Heat on medium heat until sugar dissolves; then increase heat to medium-high. Bring mixture to a boil. After sugar is dissolved and fruit has boiled for 10 minutes and softened, use potato masher to press and break up fruit to desired texture. Continue to boil mixture, stirring frequently to prevent scorching on bottom of pan. Mixture will foam up and expand, and then shrink back as it cooks. After foaming subsides, use metal spoon with thin edge to skim foam from surface and discard.
CHECK THE GELLING: Continue boiling until mixture visibly thickens in to a slow bubbling lava type consistency (approx. 215 degrees on a candy thermometer). Test by putting a spoonful on a chilled plate and return it to freezer for 2-3 minutes. (Remove jam pot from heat while waiting for gel test.) Check to see if it has gelled by tilting the plate. If the jam runs, it needs to cook longer; if it stays put or runs very slowly, it's ready. If not, continue cooking, testing again with a chilled plate every 5 minutes until it has gelled.
REFRIGERATE, FREEZE, OR CAN: Once the jam has gelled, pour it into jars or plastic containers to keep it in the refrigerator for 2 months or freezer it for up to 6 months. Use water process canning if you want to safely store the jam in jars at room temperature for a year.
FOR WATER PROCESS CANNING: Add hot jam to hot jars leaving 1/4" of headspace, and water process in water canner 15 minutes. Turn off heat, and leave jars in hot water for 5 minutes. Remove from canner and let rest undisturbed for 12 hours. Store jars in dark, cool place for up to 1 year.
For canning safety:
--Follow jar preparation and processing recommended by the USDA; see canning safety guidelines at http://www.freshpreserving.com
For general canning tips, go to www.theyummylife.com/canning_tips
*ADD SPICES, HERBS, & FLAVORS (optional), if you like. Here are some possible additions; simply stir these in and cook them along with the fruit, sugar, and lemon mixture. Taste before adding the mixture to jars to make sure you have a desirable balance of flavors; make adjustments as necessary.
--Balsamic Fruit Jam -- add 3 tablespoons aged balsamic vinegar
--Pepper Fruit Jam -- add 1 to 3 minced jalapeno or habanero peppers, with or without seeds depending on how much heat you want (this makes a great appetizer spooned over cream cheese and served with crackers); particularly good with peaches or apricots
--Vanilla Bean Fruit Jam -- split open one vanilla bean and add it to the mixture as it boils; remove bean before adding jam to jars
--Thyme Fruit Jam -- add 10 sprigs of fresh thyme to mixture as it boils; remove stems before adding jam to jars
--Ginger Fruit Jam -- add 2 to 4 tablespoons minced fresh ginger
--Cinnamon Fruit Jam -- add 1 to 2 teaspoons ground cinnamon
RECIPE SHOULD NOT BE DOUBLED. Making a bigger volume in a single batch means a much longer cooking time and the possibility that it won't gel properly.
Want more easy jam recipes? Check out this post:
