The Yummy Life

Parmesan & Romano Edible Cheese Bowls

An easy microwave recipe


Subscribe to my newsletter:
and get a free eBook instantly
Share this with your friends:

I love a recipe that looks hard and impressive but is really easy to make. This is one of those recipes. You won't believe how easy it is to make these fancy looking bowls.

At Chris and Jillian's wedding reception dinner, the salad was served in delicious edible cheese bowls. They were the talk of our table, and I was curious to figure out how to make them at home. My son, Bracken (aka Brackenthebox), said that he thought you could probably make them in the microwave. That wouldn't have occurred to me, but it sounded like an easy place to start. Worth a try.

Bracken was right. After a wee bit of trial-and-error, I figured out this fast and easy way to make these cheese bowls in the microwave. Other recipes I found for cheese bowls cooked the cheese "pancakes" in a skillet or the oven. I think this method trumps those. This is so easy, and these bowls are absolutely delicious. When I was making them, King-Man walked in the kitchen and said, "Something smells fantastic in here!" Always a good sign. I had an OOPS from my initial experimenting, and he happily gobbled it down. Loved the taste. I was off to a good start.

Use Parmesan or Romano cheese

I tried making these cheese bowls with both kinds of cheese. They were both good, but had some subtle differences. I will demonstrate cheese bowls using both kinds of cheese below. If you're wondering the difference between these 2 hard cheeses, here's my assessment:

  • Parmesan cheese is made from cow's milk. It is lower in salt and fat than Romano, and has a milder flavor. For these cheese bowls, Parmesan melts and spreads to form a sturdy, solid base, making them easy to handle and store.
  • Romano cheese is made from sheep's milk. It has a higher salt and fat content than Parmesan and has a stronger flavor. For these cheese bowls, Romano melts in a lacy pattern with a pretty, elegant appearance. The Romano bowls are more fragile than the Parmesan bowls, and need to be handled and stored with care. (I think this is what was used for the bowls at the wedding reception.)

Both have pros and cons. I couldn't decide which one I liked better, so I made some of both. You can't go wrong either way, though. They're both delicious.

These are the 2 cheeses I used:
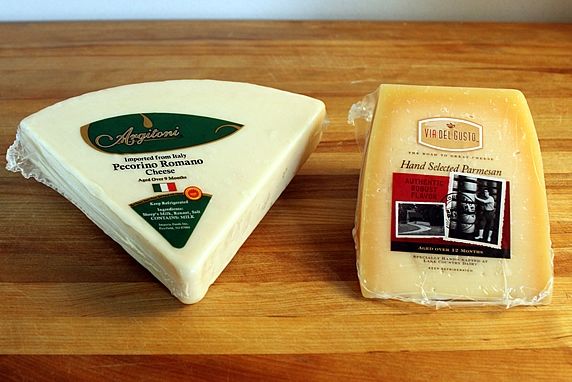
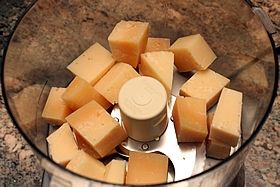
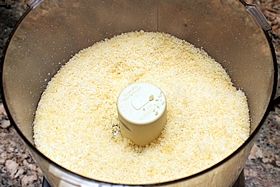
IMG_4713.jpg

You can also buy pre-grated cheese. But, it's easy to grate your own. Check out my previous post with 3 ways to grate hard cheeses like these. My favorite method uses the food processor.

Click to view post: How to Grate Parmesan Cheese

IMG_4722.jpg  IMG_4724.jpg


Step-by-step photos for making
Parmesan and Roman Cheese Bowls:

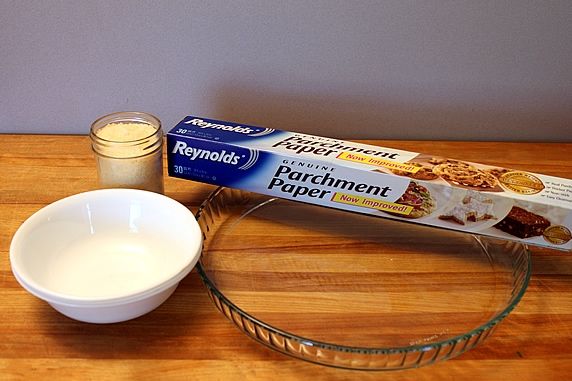
Step 1. Assemble the supplies:

  • grated Parmesan or Romano cheese (fresh cheese--NOT the dried stuff)
  • 2 nesting bowls that are the desired size of your cheese bowls (view bowls on Amazon)
  • large micro-wave safe platter or plate with flat bottom; a large dinner plate or pie plate may work, depending on the size of cheese bowl you're making
  • parchment paper (a good quality non-stick parchment paper; I recommend the Reynolds brand--it's widely available in grocery stores)  UPDATE FROM READER COMMENTS: Wilton brand parchment paper works well, too. (view parchment paper on Amazon)

IMG_5096.jpg

When I say "nesting" bowls, I mean they need to nest tightly like the two below. You can see how these bowls nest with the rims close together. These are sandwiched together to mold the cheese bowls--that's why they need to nest tightly. Chances are that you have 2 bowls that will work. I used these cheapo Corelle bowls--widely available--they have them at my local Walmart (also available on Amazon). They have a 6" diameter across the rim and are 1-3/4 inches high. You can use whatever size bowls you want, depending on how big you want your cheese bowls to be. 

IMG_5097.jpg

Step 2. Cut a piece of parchment paper that will cover the bottom of the plate/platter. (You can reuse the parchment paper for multiple cheese bowls. I made 6 bowls reusing the same piece of parchment paper.)

Step 3. Put grated cheese in center of paper. I used 1/2 cup cheese for my 6" bowl. This example is using grated Romano cheese.

  • NOTE: You may have to adjust this for your bowl size, using my size/quantity as a guideline. It may take a bit of trial-and-error to get the amount and size right. Once it's figured out, you can make these bowls quickly, one right after the other.

IMG_4798.jpg  IMG_4808.jpg

Step 4. Spread the cheese out into a circle shape. It doesn't have to be perfect. These cheese bowls have uneven edges, by design. Hold an inverted bowl over the cheese circle and make sure the cheese extends 3/4 to 1 inch beyond the rim of the bowl. My cheese circle is approx. 7-1/2 inches in diameter for a 6" bowl rim.

IMG_4809.jpg  IMG_4810.jpg

Step 5. Use scissors to trim the corners off of the parchment paper to keep them from bumping against the walls of the microwave as the turntable rotates. (This may not be necessary if you have a larger microwave than mine.)

IMG_4812.jpg  IMG_4813.jpg

Step 6. Have an inverted bowl ready to use as a mold when you take the hot cheese out of the microwave.

Step 7. Put the plate of cheese in the microwave and cook at full power until golden brown over most/all of the surface. In my 1100-watt microwave it took exactly 2 minutes. But, microwaves vary, so keep an eye on it until you figure out the cooking time for yours.

IMG_5099.jpg  IMG_4816.jpg

Step 8. Remove cooked cheese from microwave; with parchment paper still attached, IMMEDIATELY flip it over the bowl mold, centering it over the bowl. If it's not perfectly centered, it's okay. You'll end up with an asymmetric bowl, and it will look like you planned it that way. So, don't fret about it being perfect.

Step 9. Working quickly before the cheese hardens, take the second bowl and press it over the hot parchment/cheese. Press down to form the cheese into a bowl shape.

  • NOTE: You can mold the cheese over the bowl with your hands, but using a 2nd nesting bowl makes it WAY easier; and you won't burn yourself handling the hot cheese.

Step 10. Remove the top bowl and peel off the parchment paper. 

VOILA! You've got a cheese bowl. Remove it from the bowl mold, and you're ready to make another one.

IMG_4834.jpg  IMG_4836.jpg

IMG_4837.jpg  IMG_4838.jpg


OOPS ALERT! Below is a photo of the first cheese bowl I made using poor quality parchment paper that stuck to the cheese. I was able to tear off most of the paper; but as the cheese hardened, it became difficult to get all of the paper off. This is why I recommend the Reynolds parchment paper. I reused the same piece for 6 cheese bowls, and it released easily every time. There are likely other brands that would work fine, too; but Reynolds and Wilton are tried-and-true brands. Don't use wax paper--it will stick.

IMG_4825.jpg


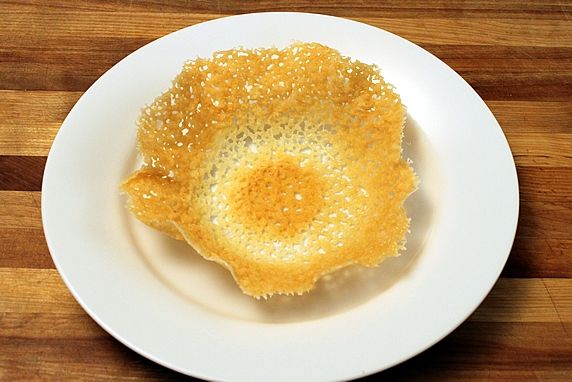
ROMANO CHEESE BOWL - Here's how the cheese bowls turned out when made with Romano cheese. I love the pretty, lacy look. But they're fragile, so be careful when you handle them.

IMG_4841.jpg

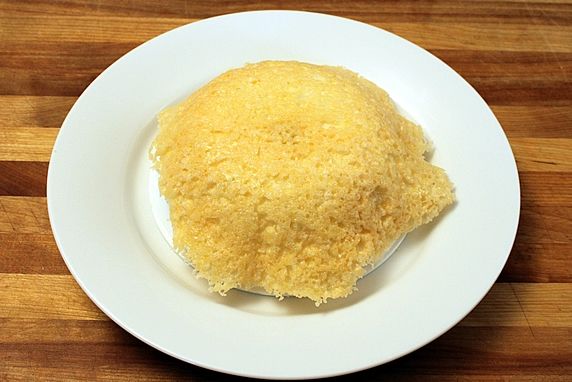
PARMESAN CHEESE BOWL - Here's the bottom of the cheese bowl made from Parmesan. You can see that the cheese spread and puffed up a bit, forming a more solid base.

IMG_4843.jpg

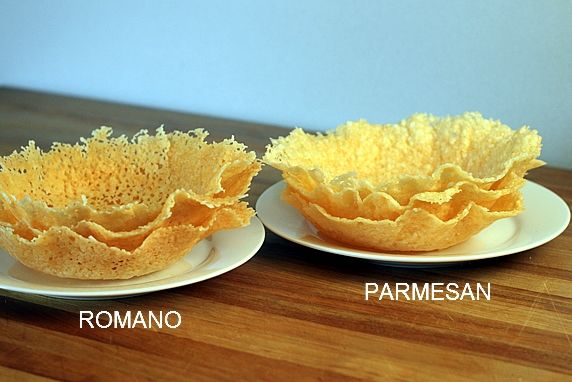
Here are stacks of the 2 kinds of bowls side-by-side. Both look and taste great. You can't go wrong with either one. Once I figured out how to make my first bowl,
it only took 15 minutes to make all six of these.

IMG_4875 - label.png

Store the bowls for up to 5 days at room temp in an airtight container. If you don't have a covered container, you can also store them in large Ziplocs.

IMG_4880.jpg

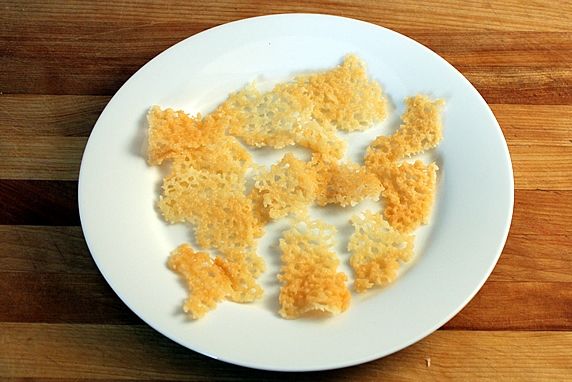
Broken bowls? Don't toss them. Break them into pieces for snacking or sprinkling on salad or soup. Yummy in any shape or size!

IMG_4861.jpg

MORE IDEAS TO TRY:

  • Additional flavors. I played around with adding sesame seeds, Italian seasoning, and garlic powder (not all at the same time) to the cheese before cooking it. It worked and tasted fine. But, honestly, I think the cheese bowls taste just as good, if not better, with nothing added at all. The flavor of the cheese was enough for me. But, feel free to get creative and add some seasonings to your cheese bowls, if you like.
  • Appetizer cheese bowls. Use the same technique, with smaller bowls and less cheese. How fun would these be to fill and serve on an appetizer platter?
  • Cheese "cracker" wedges. It's easy to make wedges to use for garnishes and snacking. After cooking the cheese round in the microwave, instead of forming it over a bowl, leave it flat and cut it into wedges with a pizza cutter or knife. Do this right away before the cheese hardens, or it will be too brittle to cut cleanly.

TO SERVE, simply fill the cheese bowls with dressed salad greens. It is so delicious to break off pieces of the bowls to eat with the salad.  Easy, elegant, impressive.

IMG_4865.png

Make it a yummy day!

 My Everyday Italian Salad is great in these bowls!
view salad recipe 
IMG_1177_Thumbnail.JPG
 

Link directly to this recipe Print this recipe
Microwave Parmesan or Romano Cheese Bowls
By Monica              Servings: four 6" bowls
Ingredients
  • 2 cups grated Parmesan or Romano cheese (fresh, not dried)
  • non-stick parchment paper (Reynolds & Wilton brands recommended; don't use wax paper)
  • 2 tightly nesting bowls (desired size for molding cheese bowls)
  • large round, flat bottomed microwave safe plate/dish (flat bottom should be at least 1-1/2 to 2 inches larger in diameter than the bowls)
Directions
Cut a piece of parchment paper that will cover the bottom of the large plate/platter. Trim to fit. (Paper may be reused for multiple cheese bowls.) Add 1/2 cup grated cheese to center of paper. Spread cheese evenly in circle with diameter 1 to 1-1/2 inches wider than rim of bowl being used for mold. Microwave at full power until cheese is melted and lightly golden over most of surface; approx. 2 minutes in 1100 watt microwave. Remove paper with cooked cheese from microwave and immediately flip it cheese side down, centered on top of inverted bowl. Place 2nd bowl on top and press down, forming hot cheese into bowl shape. Remove top bowl and peel off paper. Carefully remove hardened cheese bowl and set aside to cool completely. Repeat to make remaining cheese bowls. Prepared cheese bowls may be stacked and stored in airtight container at room temp for up to 5 days. To serve, fill with dressed salad greens.

Note: These instructions are for making cheese bowls that are molded around bowls that have a 6" diameter at the rim and are 1-3/4" high. Adjust cheese quantities according to your bowl size.
Print this Recipe Share this Recipe


Posted on Monday, August 8th, 2011
Subscribe to my newsletter and get a free eBook!
Enter your email address below and I'll send new recipes from the Yummy Life directly to your inbox (about one per week). I'll also start you off with a free copy of my eBook: 21 amazing and healthy salad and dressing recipes.
We NEVER spam or sell your information.


Post a comment
45 Comments
The Undercover Cook says:
I have always made parmesan cheese "wafers" in the oven (a very similar concept cheese melted on parchment paper in the oven) and had never thought about trying it in the microwave or going all the way up to bowl size.  How fun!!
Reply Posted 2 years ago
Monica says:
Hi! I guess my broken pieces were "accidental" wafers. The oven may be easier for the wafers since you can bake several at one time. That's difficult with the bowls, because they have to be molded so quickly--I think it would be hard to manage more than one hot cheese bowl at a time. I'll keep your wafer idea in mind, though. Thanks!
Reply Posted 2 years ago
Corinne says:
You're amazing! This will be next on my list.
Reply Posted 2 years ago
Monica says:
Thanks, Corinne. Let me know how they turn out.
Reply Posted 2 years ago
Maureen says:
My friends and I were trying to figure out how to make these after the wedding as well.  Thanks for doing it for us!
Maureen
Reply Posted 2 years ago
Monica says:
Hi Maureen. How fun to hear from the mother of the bride! I will always think of Chris and Jillian when I make these cheese bowls. What a fun day. Your daughter was a beautiful bride. :-)
Reply Posted 2 years ago
Sandy says:
Made them last night and they were great!  I used Wilton Parchment Paper and it worked beautifully!  Thanks!!!  Have loved these for years and now I can easily make my own!
Reply Posted 2 years ago
Monica says:
Hey Sandy. Perfect timing to hear from the mother of the groom, too! So glad your cheese bowls turned out. And, thanks for the tip about Wilton parchment paper. I put an update in the post and recipe to include that as another option. Thanks!
Reply Posted 2 years ago
Shreela says:
Great post! In addition to being thankful for learning how easy it is to make something as fancy as these, but I'm also thankful for you teaching how easy it is to store them, so I can make some ahead of time when no one's around, so they'll think I worked really hard on them haha
Reply Posted 2 years ago
Monica says:
Hi Shreela. No kidding, no one needs to know how easy these are. I won't tell! :-)
Reply Posted 2 years ago
Melissa A. says:
I LOVE this idea and can't wait to try it.  And, I'm all for a few broken "bowls" do sprinkle on my salad!

Great idea!!
Reply Posted 2 years ago
Monica says:
It's kind of dangerous having broken bowl pieces around. They're too easy to pop in my mouth throughout the day. These are an addictive snack!
Reply Posted 2 years ago
Pam says:
Great post!  I can't wait to try them.... Thank you!
Reply Posted 2 years ago
Monica says:
Hi Pam. Hope you enjoy these. Thanks for stopping by!
Reply Posted 2 years ago
Pam says:
Thanks Monica.  So glad I found your blog.  I made them (with parmesan and they came out perfect!  I put some marinated chopped tomatoes in them.  They were beautiful and delicious!  Thanks again
Reply Posted 2 years ago
Monica says:
Hi Pam. Wanted you to know that I used your idea to serve a tomato salad in these bowls last night. I combined some lightly dressed tomatoes with fresh basil from my garden. So good in these cheese bowls. Thanks for the inspiration!
Reply Posted 2 years ago
Pam says:
Thank you!  The basil sounds great.  I might even make some tonight!
Reply Posted 2 years ago
Su says:
Hey i ws wondering if mixing these chesse in a ratio 1:1 wud get you a more storng bowls.... like the best of both worlds?
Reply Posted 2 years ago
Monica says:
Hi Su. That's a great idea! Like you say...the best of both worlds. Thanks!
Reply Posted 2 years ago
John says:
Hi Monica,

Quick question for you. Do you know the wattage of your microwave? Can you publish that? It will make it really easy for folks to figure out how long to cook the cheese.

Thanks.
Reply Posted 2 years ago
Monica says:
Hi John. Great question. My microwave is 1100 watts. I have added that in the body of the post and recipe, in case it's helpful for others. Thanks for the suggestion!
Reply Posted 2 years ago
Paula says:
This bowls, your hash brown cups, I'm always discovering yummy things here!!
I want to try this recipe to serve with an open faced hamburgers. But no using the bowl form, of course!!
Thanks for the recipe!!
Reply Posted 2 years ago
Monica says:
Paula, what a yummy idea! These would be delicious with a burger, and even easier since you can leave the cooked cheese flat and not fuss with forming it into a bowl. LOVE that idea!
Reply Posted 2 years ago
Barefoot Pregnant and In The Kitchen says:
Oh my god... awesome awesome idea!
Reply Posted 2 years ago
Sandy says:
Monica - I tried these your way, of course!  Then I tried them using shredded cheese.  Worked fine - they were a little lacier and I used much less cheese so they were more calorie and pocketbook friendly.  Made 25 in an hour.
Reply Posted 2 years ago
Monica says:
Hi Sandy. Thanks for the tip about using shredded cheese instead of grated. I'll have to give that a try next time. (You made 25 cheese bowls? Impressive!)
Reply Posted 2 years ago
Paula says:
I cooked it yesterday (in oven, no microwave), and, as I thought, it was really delicious!!
Thanks a lot!!
Reply Posted 2 years ago
Joeleene says:
My husband and I had them on our recent cruise with fettucini alfredo...so yummy!  I couldn't wait to come home and find a recipe and your's is PERFECT and so easy to do----THANKS for sharing.
Reply Posted 2 years ago
Monica says:
Hi Joeleene! With fettucini alfredo??? YUM! Sounds fantastic. Thanks for cruising by The Yummy Life and sharing. :-)
Reply Posted 2 years ago
Shemay Kamé Krazë says:
Hi! I tried melting a couple of pounds of parmasean at once and it made a giant mess. I didnt wanna clean it, as my microwave had about an inch of parmasean in it, so i just let it cool. After cooled, I peeled a thick 1x1ft parmasean mat out of the microwave. Then, I placed it over a giant bowl and remelted it for a couple seconds. The result was a giant parmasean bowl.  It was really cool, and although it had weird stuff stuck in it from being melted into my microwave, it still was fun to load-up with Whale steak slices, spinach leaves, blue-cheese, and caesar dressing. Try it sometime!
Reply Posted 2 years ago
Angel says:
I use the same Corell bowls, only I don't do it upside-down.  I leave the bowls upright, lay the cheese covered paper over the top then press down with the 2nd bowl.  I use different kinds of hard cheeses and fill the bowls with fresh fruit.
Reply Posted 2 years ago
Monica says:
Hi Angel. Using the inside of the bowls for molds is a great idea when you want a smaller cheese bowl. That means you can get 2 different cheese bowl sizes depending on whether you use the bowls upside-down for molds or right-side-up like you. What a great tip to add some versatility to this method. Thanks so much for sharing! I had thought of serving fresh fruit in these cheese bowls, but that must be a delicious combo--I love fruit and cheese. I'm trying that!
Reply Posted 2 years ago
Monica says:
I made these last week, and just put them up on my blog here:
http://mdoublemcrafts.blogspot.com/2012/05/roasted-broccoli-served-in-parmesan.html

They were absolutely amazing! I've tried to do something like this before, but with the oven, and it ended in disaster. Your method is so simple and fool proof. Thank you for sharing :)

From one Monica to another!
Cheers.
Reply Posted 2 years ago
Skeeter says:
I eat low carb and this is something many of us eat on a regular basis. This also works with real american cheese (not the stuff in wrappers) You can also make taco shells with cheese, cut a slice in 9 pieces microwave to make cracker that taste like cheez-its. Also if you can find a silicone mat made for the microwave you will not have to use parchment paper
Reply Posted 2 years ago
Monica says:
Thanks for all the great tips, Skeeter! Cheez-Its are my favorite junk food. I'm trying your microwave cheese crackers. Yum!
Reply Posted 2 years ago
Skeeter says:
http://pinterest.com/pin/70861394107212695/

This is a link to what I am talking about. You can also sprinkle popcorn seasoning on the american cheese slices before microwaving them. Wow are they great
Reply Posted 2 years ago
Monica says:
Skeeter, thanks so much for the link! So nice of you to return and share it. Looks delicious and easy. Can't wait to try this.
Reply Posted 2 years ago
Trula says:
OMG, these are so easy and sooooo goooood!!!  No more burnt fingers from the old fashion way of making these in the oven. Thank you, thank you, thank you.  What a fabulous idea!
Reply Posted 10 months ago
Monica says:
Hi Trula. So glad to be saving you from burnt fingers! Thanks for the happy feedback.
Reply Posted 10 months ago
Lexy says:
Do these get soggy from salad dressing and then fall apart?
Does the fork have to be used gently in getting the salad ingredients?   I guess the answer is to lift the salad not stab it.
Great idea.....so pretty.....thanks for sharing.
Reply Posted 9 months ago
Monica says:
Hi Lexy. I've never had a problem with the bowls getting soggy from the dressing. However, I fill them right before we eat them, so I guess it might depend on how long they sit there. No problem with them breaking from the fork; although most people break them intentionally and eat pieces of the bowl along with the salad.
Reply Posted 9 months ago
Vannessa says:
This is awesome! I have made crisps before, but never dared... a bowl! Thanks so much for the inspiration! As I am on a low carb kick right now - this is a golden idea.
Reply Posted 9 months ago
Emarie says:
I recently found out I have a gluten intolerance, and have been craving flour tortilla bowls... well this is WAY tastier!  Thanks so much for posting it!
Reply Posted 7 months ago
Monica says:
I hadn't thought of using these as a substitute for tortilla bowls. Great idea! :-)
Reply Posted 7 months ago
Martha Ryan says:
absolutely brilliant- since all i use to cook is a microwave- im one of those!- i can even do this :)
Reply Posted 5 months ago


Let's hear what you have to say
Hi, I'm Monica...
Thanks for stopping by! This is a place to chat about the good things in life with a focus on fun, easy, healthy recipes and an occasional yummy splurge thrown in.
Read more about The Yummy Life
Free Email Updates!
Subscribe to my weekly newsletter, and I'll send you a copy of my eBook for FREE!
You'll receive about one email per week with my new recipes and ideas. We NEVER spam or sell your information.

Monica's favorite gear for
making Cheese Bowls
I used 2 of these for molding my cheese bowls.
This is a good quality paper that won't stick to the cooked cheese. It peels off easily and can be reused multiple times.


Home    |    Recipes    |    Archives    |    About The Yummy Life    |    Contact    |    Community Discussion Group
Privacy Policy - © 2013 The Yummy Life - All rights reserved