


 Print recipe

A sweet & salty flavor combo is hard to beat, and it's especially delectable with caramels. I'm excited to have hit on such an easy microwave method for making caramels that doesn't sacrifice any flavor or texture. These caramels are creamy, buttery, chewy, and delicious, and I love that there is no stove-top fussing with a candy thermometer.
I've made this recipe many times and every batch has turned out great. Once you determine the exact cooking time needed for your particular microwave, the recipe is reliable and foolproof. The caramels can be made in different molds and shapes and with a variety of toppings. I have a separate post with gifting ideas and printable tags. It would be hard to find anyone who wouldn't love having these treats as a gift.
Step-by-step photos for making
Microwave Sea Salt Caramels
Step 1. Assemble the ingredients. Butter, white sugar, brown sugar, light corn syrup, vanilla, sweetened condensed milk, coarse sea salt. Optional ingredients for toppings: chocolate chips, grapeseed or canola oil, chopped nuts, & decorating sprinkles (not pictured)

Step 2. Cook the caramel.
- Combine the sugars, corn syrup, vanilla, butter, and sweetened condensed milk in a microwave proof bowl. The bowl should be at least 2 quarts to allow for the caramel to expand as it cooks.
- Cook it in the microwave on full power for 6 minutes (for soft & chewy texture) or 7 minutes (for firm yet still chewy texture), stopping and stirring thoroughly twice during the cooking time (every 2-3 minutes).*
*TIP: ADJUST COOKING TIME FOR YOUR MICROWAVE WATTAGE
The recommended cooking times in this recipe are based on my 1100 watt microwave. If yours has a different wattage, you will most likely need to adjust the cooking time accordingly. (I found my microwave wattage on a label that is visible on the inside of the microwave.) Because microwaves vary, there may be some trial and error involved to determine exactly the correct cooking time. Click here for a cooking conversion chart for different wattages that I found online. I don't know if the chart is perfectly reliable, but it may give you some guidance in making adjustments.
Your caramels should be chewy and easy to eat--not a challenge to your dental work! If they turn out too hard, you need to reduce the cooking time. If they're too soft, increase the cooking time.

Step 3. Pour the hot caramel into a mold. I'll demonstrate 2 options.
OPTION 1 -- A Baking dish
- Line an 8x8 baking dish with aluminum foil, making sure the foil extends up the sides. Coat the foil with cooking spray.
- Pour the hot caramel into the dish and put it in the refrigerator until it is firm enough to cut, 40-60 minutes.
view 8x8 baking dish on Amazon

- Remove from the fridge. The firmed up caramel will have taken the shape of the dish, so you can lift by the foil edges to remove the entire piece at one time. Peel off the foil.

- Use a large knife to cut the caramel into whatever size you prefer. The photos below illustrate cutting 40 pieces or 24 pieces. If the cooking spray has made them too oily, blot caramels with a paper towel.
Hint: Put the caramel on a sheet of parchment or waxed paper for easier cutting and removal later. Otherwise, it may stick to the cutting board.

OPTION 2 -- Use mini ice cube trays for molds
- After microwaving the hot caramel, let it cool for 10 minutes so that you don't melt the plastic tray. Coat ice cube trays with cooking spray. Spoon caramel into the ice cube sections. I used a small scoop to simplify the task. One batch of caramel yielded 30 mini cube caramel candies.
- Refrigerate until firm.
view on Amazon: mini ice cube trays, small scoop

- Remove from fridge and flip trays over, twisting and tapping until caramels fall out. I placed them on a piece of parchment paper to prevent sticking. If the cooking spray has made them too oily, blot caramels with a paper towel.
view on Amazon: parchment paper

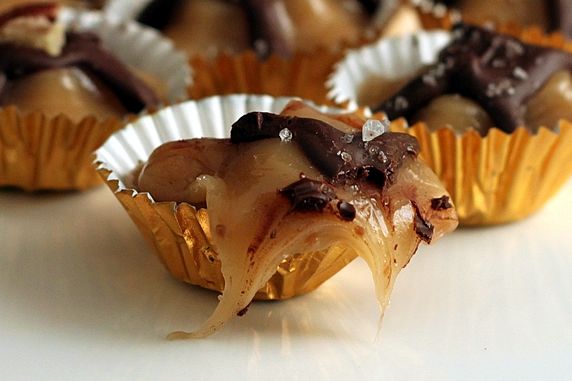
Step 4. Sprinkle generously with coarse sea salt. Press it in gently.
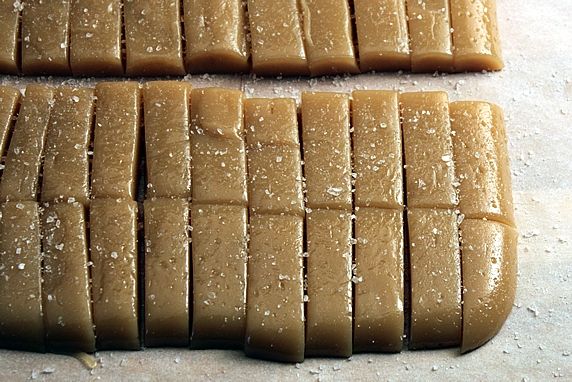
Step 5. Wrap individual pieces in parchment or waxed paper and twist the ends. Store in fridge or at a cool room temperature. Parchment paper worked the best for me--the caramels release easily without sticking. 4" x 3" paper rectangles are the perfect size for wrapping 40 lof these log-shaped caramels cut from an 8" x 8" square pan. Store in fridge or at a cool room temperature.

Love that sweet & salty combo. Yum!
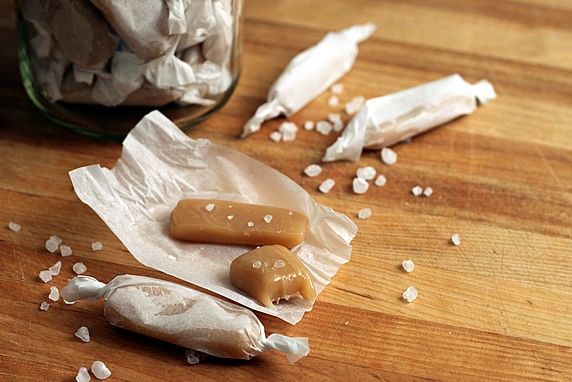
Update about shipping: I had a question about shipping these in the comments section, and I thought this was worthy of mention here so you don't miss it. If you want to ship the salted caramels, I recommend the plain, log-shapped ones pictured above, individually wrapped in parchment paper and twisted on the ends. The wrapping helps the caramels keep their shape and keeps them from sticking together. I don't recommend shipping the decorated caramels illustrated below. They may lose their shape if they get too warm during the shipping process.
Here are some optional ways to add different flavors, colors, and textures to your caramels.
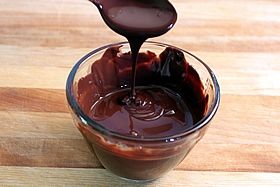
Drizzle with melted chocolate.
Add 1 tablespoon of canola oil to 1 cup of chocolate chips and microwave at 20 second intervals, stopping to stir each time, and continuing to cook just until melted--approx. 60 seconds total.

Drizzle on the chocolate with a spoon, or use a squeeze bottle. An alternative to the bottle is to put the melted chocolate in a plastic ziploc bag, push the chocolate down to one corner, twist the top of the bag, snip a small hole in the corner of the bag, and squeeze the chocolate out through the hole.
view on Amazon: squeeze bottles
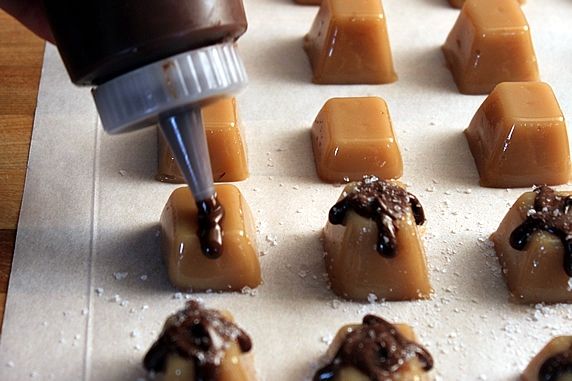
While the chocolate is still wet, sprinkle on some coarse sea salt, if desired. Here are the ice cube tray caramels:

And, here are caramels formed in the 8x8 baking dish and cut into 24 pieces:

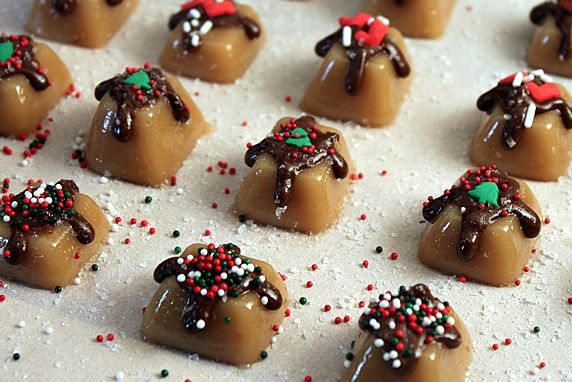
Add decorating sprinkles.
You can add decorating sprinkles in holiday or any theme colors.
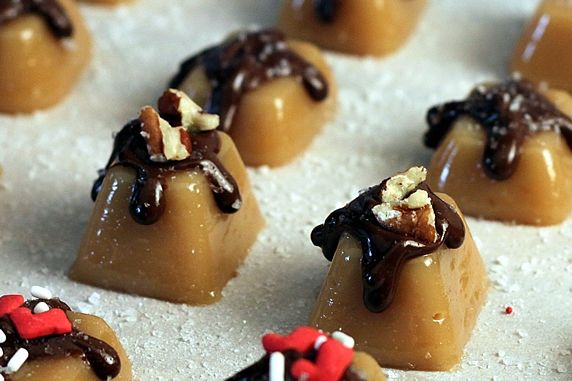
Add chopped nuts.
Add nuts for some crunch and yum. These taste like turtle candies.
Make a variety.
Using the ice cube tray molds makes these uniform in size and shape. Add a variety of toppings and arrange them in a single layer in a small box. They'll look like they came from a candy store!

Storage.
Caramels are sticky and easier to remove if arranged so they don't touch each other and are stored on parchment or waxed paper. Wrap individual caramels in parchment or waxed paper or place in single layer on top of parchment/wax paper in covered container. Store in fridge or at a cool room temperature. They will lose their shape if they get too warm. Refrigerated caramels are too stiff to eat and should be brought to room temperature before eating.
Caution about paper candy cups: I tried inserting the caramels into 2 different kinds of paper candy (mini muffin) cups with mixed results. The caramels stuck to the regular paper kind and were impossible to remove without making a mess; but they released fine from foil or non-stick parchment liners. Cutting small pieces of parchment paper to set them on works, too.
Here's the best part...biting into one of these gooey, chewy, creamy treats. SO, SO GOOD. Too good to be this easy!
view on Amazon: non-stick mini muffin cups
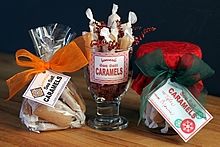
Want to give these caramels as a gift?
Check out my post with packaging ideas and printable tags.
Click to view Sea Salt Caramel Gift Ideas & Tags
Make it a Yummy day!
Monica

- 1/4 cup butter, cut in 8 pieces
- 1/2 cup white sugar
- 1/2 cup brown sugar, firmly packed
- 1/2 cup light corn syrup
- 1/2 cup sweetened condensed milk
- 1 teaspoon vanilla
- coarse sea salt
- FOR OPTIONAL CHOCOLATE TOPPING:
- 1 cup semi-sweet chocolate chips
- 1 tablespoon canola oil
- OTHER OPTIONAL TOPPINGS:
- Chopped nuts
- Decorating sprinkles
1. Line an 8x8 baking pan with aluminum foil, coat the inside with cooking spray, pour in the hot caramel. Place in fridge until firm enough to remove & cut (approx. 40-60 min). Pull up on sides of aluminum foil and remove the whole slab of caramel at one time. Place caramel slap on cutting board covered with parchment or waxed paper and cut into pieces of desired size.
2. Coat 2 plastic mini ice cube trays with cooking spray. Allow hot caramel to cool for 10 minutes after removing it from microwave. Use spoon or small scoop to fill sections of tray. Place in fridge until firm (40-60 minutes). Invert trays and twist and tap until caramels fall out.
If the caramels are oily from the cooking spray, blot them off with a paper towel.
Sprinkle coarse sea salt directly on top of caramels if not adding chocolate drizzles.
*TIP: ADJUST COOKING TIME FOR YOUR MICROWAVE WATTAGE
The recommended cooking times in this recipe are based 1100 watt microwave. If yours has a different wattage, you will most likely need to adjust the cooking time accordingly. Because microwaves vary, there may be some trial and error involved to determine exactly the correct cooking time. (Microwave wattage can usually found on a label that is visible inside of the microwave.) If caramels are too hard, cooking time should be reduced. If they're too soft cooking time should be increased.
OPTIONAL TOPPINGS FOR CARAMELS:
--Drizzle with melted chocolate. Melt chocolate chips with oil in microwave at full power in 20 second intervals, stirring and continuing to cook just until melted (approx. 60 seconds total). Drizzle on caramels with spoon or condiment bottle. While still wet, sprinkle with coarse sea salt.
--Sprinkle wet chocolate with chopped nuts or decorating sprinkles.
STORAGE: Caramels are sticky and easier to remove if stored on parchment paper. Wrap individual caramels in parchment paper or place in single layer on top of parchment paper in covered container. Store caramels in fridge or at a cool room temperature. (They may lose their shape if they get too warm.) If refrigerated caramels are too stiff to eat, bring to room temperature before eating.
Recipe inspired by Cara at TheBoysMadeMeDoIt.com
You might also like these recipes:

