The Yummy Life

Easy Chocolate Covered Strawberries With A Gourmet Flair


Subscribe to my newsletter:
and get a free eBook instantly
Share this with your friends:

People think chocolate dipped strawberries are fancy food. Honestly, I've never understood why. This is one of the easiest desserts I make. I've been making these for many years. We've had them for Valentine's Day as long as I can remember. Whenever I serve them, people act so impressed. Like this is supposed to be hard. It's not. It is so, so easy.

Like caramel apples (see my post for making those), strawberries can be dipped in chocolate and customized with an unlimited number of decorative and tasty toppings. Once you have all of your ingredients assembled, you can make these in 30 minutes. I'm not kidding. 


Step-by-step photos for making Chocolate Covered Strawberries.

Step 1. Assemble the ingredients: strawberries, chocolate chips (I prefer semi-sweet), white chocolate or vanilla chips, canola oil, oil-based food coloring (optional).

ingredients

You can dip your strawberries in melted chocolate and stop there. They're delicious plain. If you want to add some variety, gather some toppings that appeal to you. Here, I used Kraft Caramel Bits (melted in the microwave and drizzled on), crushed Oreos and candy canes (to crush them, put them in a plastic bag and whack them with a skillet or meat pounder), chopped toasted pecans, chopped toasted almonds, course sugar mixed with cinnamon, coarse red sugar, red/pink/white sprinkles, mini chocolate chips.

toppings

Step 2. Wash the strawberries. I fill a small bowl with water, hold the strawberry by the stem/leaves and immerse only the red part of the berry in the water. (If you immerse the leaves in water, as they dry they may curl and get a dried-out look that isn't as pretty.) After dunking each strawberry, place it on a paper towel to dry completely. Or, blot off the water if you don't have time to let them air dry. It's important that they're totally dry when you dunk them in melted chocolate.

Step 3. Melt the chocolate chips. Some people over-complicate this with a tedious, tricky tempering process. I've never bothered with that. I've always melted my chips in the microwave. For years. It's worked every time. The only way you can mess up is by overcooking the chocolate. Heat and stir the chips in 20-30 second intervals until the last chunks melt and stir in. Then stop heating. Adding a small amount of canola (or vegetable) oil, gives the melted chocolate a smoother, glazy texture and appearance. Here's my melting recipe, for more details:

View Melted Chocolate for Dipping and Drizzling Recipe


chips w. oil  stawberry

  • TIP: If you'll be melting a lot of chocolate, the slow cooker is a great way to melt the chips and keep them at a perfectly melted consistency for an extended period of time. You can read about it in my post: Slow Cooker Melted Chocolate

Step 4. Dip each berry in melted chocolate. Swirl the berry around in the melted chocolate, covering it in a layer of chocolate almost to the top. Let chocolate drip off and scrape off excess against edge of bowl.

strawberry in choc  coated w choc

Place the dipped strawberry on a tray lined with parchment or waxed paper.

on pan  on parchment

Step 5. Add toppings, if desired. While the chocolate is still wet, roll the berry in toppings or sprinkle them on.

Step 6. Add drizzles, if desired. After the chocolate coating has set (this only takes minutes), add drizzles in a contrasting melted chocolate color. I used semi-sweet chocolate and pink-colored white chocolate on the white dipped berries, and white and pink colored chocolate on the dark chocolate berries. Use one of these methods:

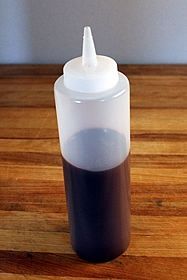
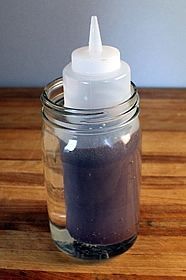
1. Pour melted chocolate into a squeeze bottle. Keep it warm in a jar of hot water. This is the method I recommend, if you have a squeeze bottle. It gives you the most control.
2. Pour chocolate into a plastic bag. Twist the bag at the top and push the chocolate toward one lower corner of the bag. Snip the corner with scissors, and apply melted chocolate by squeezing it through the hole.
3. Use a spoon. You can't be as precise with a spoon, but you can achieve a lacy, pretty effect by holding the spoon of melted chocolate higher over the berry and drizzling a thin stream of chocolate in a scattered, zig-zag fashion. 

choc in bottle  hot water jar

To color the white melted chips, be sure to use oil-based food coloring that is made for candy. I used Wilton candy colors--this is not the kind normally found in grocery stores. Most of the common food colorings are water based and will make the melted chocolate immediately form a paste consistency that can't be drizzled. Another alternative is to use pink Wilton candy melts. Or, skip the colored melted chocolate altogether; you can decorate beauiful strawberries without it.

2 bottles  drizzle white

The melted chips can be drizzled on in a random, lacy pattern, or applied in long drips as pictured below. This is a tray of berries dipped in semi-sweet chocolate; some have been rolled in toppings and others have had caramel or melted chips drizzled on. I like to make a variety.

IMG_0879.jpg

These berries were dipped in melted white chocolate chips and then decorated.

IMG_0892.jpg


These are the berries I dipped and decorated today. You can get as creative as you choose with these. I like to leave a few of them plain (dipped with no added toppings). Some people prefer them that way. Like King-Man.

White Chocolate Dipped Varieties

1. Plain--no toppings.
2. Drizzled with pink-colored melted white chocolate. Coarse sugar sprinkles on top.
3. Sprinkled with coarse red sugar. 

white plain white pink white red sugar

4. Semi-sweet chocolate drizzled on with a spoon.
5. Mini-chocolate chips sprinkled on.
6. Rolled in chopped toasted almonds. 

white choc top white mini chips white almonds

7. Rolled in crushed candy canes.
8. Roll in a mixture of coarse sugar and cinnamon.
9. Semi-sweet chocolate drizzled on with a spoon.

white peppermint white cinnamon white choc drizzle

10. End dipped in melted pink-colored white chocolate; sprinkled with coarse sugar.
11. Rolled in red nonpareils sprinkles.
12. Rolled in crushed Oreos. 

white pink dip white sprinkles white oreo


Dark Chocolate Dipped Varieties

1. Plain--no toppings.
2. Drizzled with melted white chocolate chips.
3. Rolled in chopped toasted almonds. 

choc plain choc white drizzle choc almonds

4. Drizzled with pink-colored melted white chocolate. Coarse sugar sprinkles on top.
5. Drizzled with melted caramel bits, sprinkled with toasted chopped pecans.
6. Rolled in pink/red/white nonpareils sprinkles. 

choc pink drizzle choc turtle choc sprinkles

7. Rolled in crushed candy canes.
8. Drizzled with melted white chocolate chips.
9. Rolled in toasted chopped pecans. 

choc peppermint choc white top choc pecans

Storage tip: Keep these in a cool place or the fridge (uncovered or loosely covered) for up to 8 hours before serving. If stored longer, juice from the berries begins to slowly leak out of the bottom and pools at the base of each berry. They still taste good the next day, but the texture gradually gets mushier.

Serving tip: Arrange the finished berries on a platter, as pictured below. Or, place berries in individual paper cupcake liners before arranging them on the platter--this makes them easy to grab and eat.

Turn these into a gift: Put a dipped berry or two in a paper cupcake liner, insert in a cellophane bag, tie it with a ribbon, and attach a cute tag. Here are some downloadable tags and gifting ideas:

click here for Valentine's Day Gift Tags

Here's a full platter of these delicious treats. The variety makes it so pretty! And impressive. Don't tell anyone how easy it is. It'll be our little secret.

IMG_0978crop.jpg

It's always fun to watch people try to choose. Which one to do you want?

IMG_0958.jpg

Make it a yummy day!

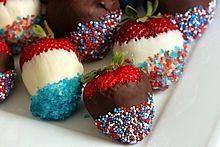
Check out my post about decorating strawberries for the 4th of July:
Red, White & Blue Chocolate Covered Strawberries

ThumbnailIMG_4141.png 

Link directly to this recipe Print this recipe
Chocolate Covered Strawberries
By Monica              Servings: 16-18 large berries
Ingredients
  • 1 bag (12 oz) semi sweet chocolate chips, divided
  • 1 bag (12 oz) white chocolate or vanilla chips, divided
  • 2 pounds strawberries, washed and dried completely
  • 4 tablespoons canola oil
  • oil-based food coloring (optional), the kind used specifically for coloring candy
  • TOPPING SUGGESTIONS: caramel bits (melt in microwave and drizzle on), crushed oreos and candy canes (to crush them, put them in a plastic bag and whack them with a skillet or meat pounder), chopped toasted pecans, chopped toasted almonds, course sugar mixed with cinnamon, coarse colored and plain sugar, nonpareils sprinkles, mini chocolate chips
Directions
Put 1 cup chocolate chips in a microwave-safe bowl with 1 tablespoon canola oil. Cook on full power, checking at 20-30 second intervals, stirring each time. Stop heating when most, but not all, of the chips are melted--there should be a few chunks left. Stir until it is smooth and chips are completely melted.  Be careful not to overcook. Divide out half of strawberries and dip in melted chocolate, holding by the stem, turning until berry is coated almost to stem; let excess drip off. Immediately roll in toppings, or sprinkle them on. Place on parchment or waxed paper lined pan.  Repeat with remaining half of strawberries using melted white chocolate chips. To drizzle contrasting melted chocolate on coated berries, melt remaining chips in same way and drizzle onto berries with a spoon or squeeze bottle. Food coloring may be added to the melted white chips, if desired. Store, uncovered or loosely covered, in fridge or cool place for up to 8 hours.
Print this Recipe Share this Recipe


Posted on Friday, February 11th, 2011
Subscribe to my newsletter and get a free eBook!
Enter your email address below and I'll send new recipes from the Yummy Life directly to your inbox (about one per week). I'll also start you off with a free copy of my eBook: 21 amazing and healthy salad and dressing recipes.
We NEVER spam or sell your information.


Post a comment
81 Comments
sara says:
These are so pretty! I love all the different variations...gorgeous!  Plus, YUM, I love chocolate covered strawberries.
Reply Posted 3 years ago
Monica says:
Thanks, Sara. These are always fun to make. So glad you stopped by!
Reply Posted 3 years ago
Rona says:
Wow! I'm amazed its so easy. Thanks for the tips I will be doing this for valentine's day!
Reply Posted 3 years ago
Monica says:
Hi Rona! Everyone is always so surprised how easy this is. But, it truly is. And, they taste fantastic, too. Have a wonderful Valentine's Day!
Reply Posted 3 years ago
Jenn@eatcakefordinner says:
These look incredible.  You make me really wish I had some strawberries right now so I could try these.  By the way, I looked up some strawberries like these earlier on a website that I have heard way good things about, but 12 strawberries cost $30.  Crazy huh?  Thanks for all the tips and great ideas.  
Reply Posted 3 years ago
Monica says:
Hi Jenn. Wow, that is crazy. I had no idea these strawberries could be that expensive. It definitely is cheaper to make your own! I'll enjoy these even more now. :-) Thanks.
Reply Posted 3 years ago
Medifast Coupons says:
How long did it take you to make that plate of strawberries?
Should they be made the day you are serving or can you make a day ahead of time?
Reply Posted 3 years ago
Monica says:
They're better eaten the same day. They start to get mushy and runny by the 2nd day.
Reply Posted 3 years ago
Jessica says:
These are adorable! And I am sure tasty!
Reply Posted 3 years ago
Monica says:
Thanks, Jessica. They are definitely tasty, although I'm sure they'll get better as strawberries are closer to being in season.
Reply Posted 3 years ago
Marivee says:
I've made chocolate covered strawberries before but I was looking for more creative, unique toppings for them. You explained everything so well and the pictures of your strawberries are so awesome!!! Thanks for taking the time to make the recipe so easy.
Reply Posted 2 years ago
Monica says:
Hi Marivee. How sweet of you. I'm so glad you like the strawberry ideas. They truly are easy! :-) Thanks so much for your nice comment.
Reply Posted 2 years ago
Lora says:
We made these for a bridal shower and they were a big hit.  Thank you for sharing with such beautiful pictures and easy to follow instructions!
Reply Posted 2 years ago
Monica says:
Hi Lora. I'm so glad these strawberries were a hit a your bridal shower. Thanks so much for taking the time to come back and let me know. You made my day! :-)
Reply Posted 2 years ago
Christin says:
This is perfect for my husband!
Trying to keep money off my card for mine and my husband's later anniversary for a trip, so I really can't afford to pay 30$ for six strawberries, 12$ - 14$ for shipping plus tax.
He loves chocolate covered strawberries, and I have made them before but with the bottled hard shell chocolate used on icecream. It does work for a super quick fixing (even my mother-in-law switched from her recipe of chocolate berries to that), but it doesn't look so good. I wanted something to look great for when my husband comes home from work and finds sunflowers with chocolate covered berries (yeah, my husband has his favorite flower) for an early/on time anniversary present.
This is just what I was looking for. Can't wait to try it out.
Question though (Monica); is it posible to store these in the freezer for less than an hour, just to speed up the hardening?
Reply Posted 2 years ago
Monica says:
Hi Christin. What a fun surprise for your husband! These are definitely less expensive and more fun to make yourself.

In answer to your question, I've had good luck speeding up the hardening time in the refrigerator. But, I would be hesitant to put them in the freezer. The reason is that when chocolate is exposed to extreme temperature changes, it sometimes gets "chocolate bloom"--that is a white powdery appearance on the surface. The chocolate still tastes fine, but it doesn't look very appealing. That's why it's risky putting strawberries that have just been dipped in melted chocolate directly into the freezer. My advice is to play it safe and let them harden at room temperature or in the fridge. It shouldn't take the chocolate long to harden.

Have fun with your surprise strawberries!
Reply Posted 2 years ago
Christin says:
Okay, thanks!
Anniversary is way off in September, but will get back later to let you know how they went.
Reply Posted 2 years ago
susan says:
Thanks, Monica - so pretty!  I'm going to make these for a semi-formal fundraiser and need to make dozens.  Will only be able to do a couple of coatings.  Which 2 or 3 would you say are the biggest hits?
Reply Posted 2 years ago
Monica says:
Hi Susan. These strawberries are perfect for this kind of event. Now to choose 2 or 3 kinds. My experience is that there are people who like both kinds of chocolate, but more people prefer the dark chocolate over the white. So if you do 3 kinds, I recommend two of them dipped in dark chocolate and one of them in white. For the toppings, hmmm, I'm not sure how to advise you. I think the ones with drizzles of a contrasting color are the most elegant looking (white on dark, dark on white, or a color drizzled on). The ones I think taste the best are the dark chocolate rolled in nuts and the white chocolate rolled in cinnamon sugar or oreos; but they may not be as pretty as some of the other ones. I would stay away from the caramel coatings since you're making a large quantity of these--it's messier and harder to manage (tastes good, though!). The white chocolate with crushed oreos are delicious, but I don't know if the cookies would get soggy if they're made too far in advance (I haven't tested that). Sorry my advice seems to be all over the place. I guess, in sum, it's easiest to go simple and elegant with drizzles but tastier and more unique to roll some of the strawberries in nuts, cinnamon sugar or sprinkles. Hope that helps!
Reply Posted 2 years ago
Susan says:
Thanks so much, Monica.  I appreciate your advice and must say I was drawn most strongly to the dark chocolate with drizzles or nuts, myself.  I will go with those, and try the white choc with oreos in advance to see how they hold.  they sound fabulous, and I think the look will be OK, if they taste as good as I think they will.   Thanks for the posting and for the help!   :)
Reply Posted 2 years ago
Susan says:
so sorry for the repeats - my wireless is stuttering tonight.  
Reply Posted 2 years ago
Susan says:
so sorry for the repeats - my wireless is stuttering tonight.  
Reply Posted 2 years ago
Danahe says:
I love this,I was looking for something like this for my husband's BDay...Thanks for sharing :)
Reply Posted 2 years ago
Monica says:
Danahe, you are so welcome. I hope your husband likes them! :-) Thanks for stopping by and commenting.
Reply Posted 2 years ago
Christin says:
My husband loved them!
Dipped with the chocolate and white chips turned out a little bit thick for us, but the rest turned out great. I crushed my own oreos and those ones turned out the best, and my husband loved them the most. But then I started experimenting with what I could do with them.
The drizzling effect wasn't working so well with the spoon and didn't feel like stuffing it into a bag, so I ran the top layers down the sides with my finger nails then applied a dab for the third layer of a different colored and swirled the two colors together. That turned out nice. Then I was doing one side chocolate and one side white.
It all turned out so nice and my husband was complimenting that they were the best strawberries that had been hand made in the house so far. Then he asked who I got it from, which I confessed this site and showed the pages I printed. Now he wants to try strawberries with the sprinkles and nuts!
Thanks Monica!
Reply Posted 2 years ago
Monica says:
Yay Christin! So glad your strawberries turned out well and got your husband's approval. Love your additional tips, too. Thanks so much for coming back and sharing. :-)
Reply Posted 2 years ago
Reza says:
Hi There Monica. GREAT Stuff :X Loved It
I Have A Question About The Time Before Serving.
You Said That It's Better If We Keep Them In Room Tempture But I Found a Youtube Video Located Here:
http://www.youtube.com/watch?v=-TVZGnMGv_s
Which Says To Put Them In Refrigrator 8 Hours Before Serve!! And That After Two Hours In Room Tempture The Chocolate Will Strat To Melt! Can you Help Me With This?
Reply Posted 2 years ago
Monica says:
Hi Reza. I'm a little confused. I don't say anywhere in my post that these should be stored at room temperature. (Maybe you've read my caramel apple post? I do recommend that those be stored at room temp.) My storage instructions in this post for strawberries says "Storage tip: Keep these in a cool place or the fridge (uncovered or loosely covered) for up to 8 hours before serving." That's consistent with the advice in the video you linked to. I always keep mine in the fridge until I'm ready to serve them. Hope that helps. :-)
Reply Posted 2 years ago
Reza says:
:D I Was Reading The Comments Where You Said : "My advice is to play it safe and let them harden at room temperature" And I Got e Little Confused , And Then Made You Confused As Well :D Ok Tnx For a Great Recipe And Welcoming Relply ;)
Reply Posted 2 years ago
kelley says:
Thanks for explaining how to keep the stems looking nice. I rinsed my berries in a colander and dried them but the leaves shriveled up (berries were fine). So, if I keep the leaves dry, they shouldn't wilt. Thanks again!
Reply Posted 2 years ago
Monica says:
Hi Kelley. That was a trial-and-error discovery. I initially made beautifully dipped berries with shriveled looking leaves. That prompted me to figure out a way to wash the berries without getting the leaves wet. Glad that tip is helpful. Thanks for letting me know! :-)
Reply Posted 2 years ago
Sonia says:
Hi Monica!
Thanks for this wonderful step by step--pics were great as well!
I am planning my youngest daughters Sweet 13 Dance Party, at "Club Régan", & didn't want to get toooo extravagant with everything, since it's for 13-14 yr olds. I had looked up chocolate dipping sauces for crockpots (seemed do-able), chocolate fountains (too expensive & sound messy), etc. Just want to have something "special" for her, but within our budget. This looks like it'll do the trick! The guest list is approx. 46 kids & 8 adults & I'd make them before hand, but do you have any suggestions on how many to make?
Reply Posted 2 years ago
Monica says:
Hi Sonia. What a special party for your daughter! These strawberries should be perfect--it's hard to find anyone who doesn't like them. I would probably plan on 2 strawberries per person or in that ball park. Good luck with your party planning. :-)
Reply Posted 2 years ago
alanis says:
I tried making the pink chocolate ones before but failed miserably.  On top of that I made a huge mess.  I will try your method tomorrow.  Hopefully it will turn out right.  Thank you for sharing your recipe.  
Reply Posted 2 years ago
Monica says:
Hi Alanis. The key to making the pink chocolate ones is to use either oil-based pink food coloring (not the typical water-based kind found in grocery stores) or pink candy melts. Otherwise, I find the above method to be pretty easy. I hope you do to! :-)
Reply Posted 2 years ago
alanis says:
Thank you Monica! I'm actually going to walmart right now to buy the white chocolate and hopefully I can find the pink ones or the oil based food coloring.  
This will be my second time trying to make this.  I had one of these pink chocolate covered strawberries at a babyshower and I couldn't stop craving for more since.  
Reply Posted 2 years ago
alanis says:
Thank you so much Monica.  I just finished making my pink ones.  It was so easy to make following your instruction.  I got lucky.  Since it's almost Valentine's, the Wilton Candy Melt was available at Walmart.  I didn't have to mix the color.  I wish I can upload some pictures to show you.  Thank you!
Reply Posted 2 years ago
Monica says:
Hi Alanis. Yay! Glad you were able to find the candy melts. That makes it so much easier. I wish I could see your pictures. If you'd like, you can email them to me at monica@theyummylife.com.
Reply Posted 2 years ago
Jenn says:
Just what I was looking for..all the variations for decorating them!  They look luscious!!
Reply Posted 2 years ago
Monica says:
Thanks, Jenn. These are really fun to make, too!
Reply Posted 2 years ago
Gwen says:
Thanks Monica.  We are making a Valentines basket to be raffled off.  I'm going to try this tomorrow.  I bought a small heart shaped bowl and some florist foam.  Have you used toothpicks or wooden skewers in these before?
Reply Posted 2 years ago
Monica says:
Hi Gwen. What a fun idea for a Valentines basket! No haven't used toothpicks or wooden skewers in these before. I think the skewers might work better, depending on the size of your strawberries. Cute idea!
Reply Posted 2 years ago
Gwen says:
I made a mess of the idea.  I was thrilled because I got to sample the mess!  LOL  So I'm just going to fill the heart bowl with strawberries.  They tasted so awesome and were really pretty.  Thank you for the recipe and ideas.  I'm gonna try it for my parents for Valentines day.    
Reply Posted 2 years ago
yaya land says:
they'll drip and the juices will ooze everywhere.
Reply Posted 2 years ago
beth says:
so beautiful.. i was just wondering how much oil you use?
Reply Posted 2 years ago
Monica says:
Hi Beth. Add 1 tablespoon of oil for each cup of chocolate chips.
Reply Posted 2 years ago
Madison says:
These are excelent. I just made them!! super easy & love all the pictures!! thanks for the idea!! YUMMY :) i just dipped them in milk chocolate & drizled them in white chocolate! very greay & SUPER easy!  i love this recipe!! Thanks for posting!!!!!! :D
Reply Posted 2 years ago
yaya land says:
last time i made these, i encountered the one and only problem i've ever had.  the chocolate melted and stayed clumpy, dried way too fast, and had a dull appearance (rather than shiny).  can not figure out what went wrong.  anyone else ever have this occur?
Reply Posted 2 years ago
Monica says:
Hi Yaya. I had that happen once, too. At the time, I thought it was probably the chocolate that I used--too old maybe? Thanksfully, I haven't had that problem again. One of those unsolved cooking mysteries. :-)
Reply Posted 2 years ago
tippany says:
Did you dry the strawberries completely? Water, even just a very small amount, on the strawberries after you wash them, might have caused the chocolate to become clumpy.
Reply Posted 2 years ago
yaya land says:
try this with bananas, blueberries (kind of hard to deal with the size, but very yummy), raspberries, cookies, brownie cubes on a popcicle stick.....use your imagination!!  also makes a wonderful sealed icing on petit fours.
Reply Posted 2 years ago
Dea says:
Im actually using this for mothers day, so this will be a muse! My mom loves healthy stuff with extra stuff;) so this would make a great gift thanks theyummylife.com
Reply Posted 2 years ago
Monica says:
Hi Dea. Hope your mom enjoyed the strawberries. What a lovely gift!
Reply Posted 2 years ago
Amanda says:
Why do the juice come out of them. Is there anything to do for this?
Reply Posted 2 years ago
Monica says:
Hi Amanda. Do you mean the juice comes out of them after they have been made and refrigerated overnight? This is sure to happen by the next day. Unfortunately, I don't know of any way to avoid it. That's why they can't be made too far ahead.
Reply Posted 2 years ago
Megan says:
What is the point of the canola oil? I have seen some recipes with butter and some with crisco.  By adding these to the choc. does it make it so it sticks better?
Reply Posted 2 years ago
Monica says:
Megan, good question. It is really only for looks. If gives the chocolate coating a smoother finish with a bit of a sheen. The oil can be omitted if you don't care about that.
Reply Posted 2 years ago
Raven says:
Thanks so much for posting this recipe for chocolate coverd strawberries it was so easy to do and they turned out perfect I made them for mothers day and my mom absolutely loved them great recipe and tips!
Reply Posted 2 years ago
Monica says:
Hi Raven. I'm so happy to hear your mom liked the strawberries. How sweet of you to make them for her. Thanks for letting me know. :-)
Reply Posted 2 years ago
Kiley says:
Thanks for the great info! I'm going to try these but I don't use canola oil - can I used coconut or olive oil instead with a similar result? Thanks again!
Reply Posted 12 months ago
nery says:
i love all the decorations i just have a question should i put the strawberrys on the freezer for a while and then covered them
Reply Posted 8 months ago
Monica says:
Hi Nery. No, I don't recommend freezing these. Refrigerate them, but don't freeze them.
Reply Posted 8 months ago
nery says:
Thank you so much im going to do some today for my husband its his birthday  you really helped me alot have a great day
Reply Posted 8 months ago
Tiffiney says:
Hello, your berries are beautiful and I love your instructions..I  have tried to make these in the past, but sometimes have a problem with the strawberry  juices leaking through the chocolate. Is there anything to prevent and/or stop this from happening?
Reply Posted 7 months ago
Monica says:
Hi Tiffiney. The only way I know of to avoid the leaking is to serve/eat these within a few hours of when they are made. For me, they start leaking when I refrigerate them overnight.
Reply Posted 7 months ago
Tiffiney says:
Ok, got it...Thanks!!!
Reply Posted 7 months ago
Anna says:
Thank you so much for these easy to follow directions and great topping suggestions. Can't wait to try making these myself:-)
Reply Posted 5 months ago
Monica says:
Hi Anna. You are so welcome. Hope you have fun making these. SO EASY and always a hit. :-)
Reply Posted 4 months ago
Jessica says:
Monica, Thank you for posting this. I've made chocolate covered strawberries many times before, and people always love them. The savings are also fantastic! However, whenever I tried to get fancy and do a drizzling effect, I always ended up with blobs of chocolate. Therefore, when I saw your suggestion of using a squeeze bottle for drizzling, all I could think was - genius! I've instructed my husband to bring home a squeeze bottle after he gets off work, and I'm going to try that technique out tonight. Thanks for a great tip!
Reply Posted 4 months ago
Monica says:
Hi Jessica. Those squeeze bottles make all the difference for controlling the drizzles. Hope they work well for you, too. :-)
Reply Posted 4 months ago
Debbie Furlo says:
I have made these but I use half semisweet and half milk chocolate chips along with a table spoon of Crisco using the double boiler method.  We love them and just 1cup of each, then di away. The fancy ones are a nice touch. Thanks for your ideas.
Reply Posted 4 months ago
Monica says:
Hi Debbie. Thanks for sharing your recipe. I like the half and half idea! :-)
Reply Posted 4 months ago
Dorie says:
I like the idea of the squeeze bottles.  This might be silly but it is hard to clean them without the chocolate sticking inside?
Reply Posted 4 months ago
Monica says:
Hi Dorie. Not a silly question at all. To clean the bottles, I squeeze out as much chocolate as possible, then fill them with hot water and a squirt of dish soap, put the lid on and shake them, pour them out and repeat. I've also put mine in the top rack of my dishwasher to get a final cleaning.
Reply Posted 4 months ago
Elizabeth says:
The toppings sound yummy. My question is  how long does it take for the chocolate to set. I'm making these for Valentines Day for my parents. Thanks for the recipe I can't wait to try it.
Reply Posted 4 months ago
Monica says:
Hi Elizabeth. These set fairly quickly, 30-60 minutes. You can stick them in the fridge to speed it up. Hope your parents enjoy them! :-)
Reply Posted 4 months ago
Elizabeth says:
My parents loved them!!!!!!!!!!!!!!!!!!! I will continue to make this recipe. Next time, I want to be more elaborate with the decorations. Thanks Monica.
Reply Posted 4 months ago
Monica says:
Wonderful to hear, Elizabeth. So happy your parents loved these. Thanks so much for returning to let me know. :-)
Reply Posted 3 months ago
Dana says:
I've been reading recipes online for the past 30 minutes trying to find the best way to make chocolate covered strawberries. After reading your post I see no need to continue reading other posts! The detail and options you give is great. I intend on making these for my mother for mother's day. Thank you!
Reply Posted 3 weeks ago


Let's hear what you have to say
Hi, I'm Monica...
Thanks for stopping by! This is a place to chat about the good things in life with a focus on fun, easy, healthy recipes and an occasional yummy splurge thrown in.
Read more about The Yummy Life
Free Email Updates!
Subscribe to my weekly newsletter, and I'll send you a copy of my eBook for FREE!
You'll receive about one email per week with my new recipes and ideas. We NEVER spam or sell your information.

Monica's favorite gear for
making Dipped Strawberries
I use these for drizzling melted chocolate onto the dipped strawberries.
These are oil-based so they are suitable for coloring chocolate. Most of the common food colorings found in grocery stores are water based and will make the melted chocolate immediately form a paste consistency that can't be drizzled. Includes pink, green, violet, and black.
These 6.5 oz. bowls are perfect for condiments, sauces, and prep bowls. I love the lids for fridge storage. They're perfect for preparing and storing the toppings for dipped strawberries.
I place the dipped strawberries on parchment paper and leave them until the chocolate has hardened. The strawberries easily peel off of this paper.


Home    |    Recipes    |    Archives    |    About The Yummy Life    |    Contact    |    Community Discussion Group
Privacy Policy - © 2013 The Yummy Life - All rights reserved